Keeping a shared Slurm cluster for foundation model development in sync entails keeping several separately maintained pieces of configuration matched to what’s running on the nodes. The cluster’s shape lives on multiple configuration files, its software in custom scripts, its network topology in files that must be edited as nodes change, and its users in a roster that an administrator must maintain and rerun. Over time these pieces drift away from what’s actually running, and nothing tells you when they do.
We believe cluster configurations should be managed the way you manage the rest of your AWS infrastructure. You declare what you want through an API or the console, AWS validates it before it’s applied, the cluster is kept in that state continuously, and you can see whether it’s working. During 2026, Amazon SageMaker HyperPod brought that approach to Slurm clusters, with API-driven Slurm configuration, AMI-based configuration, continuous provisioning, automatic topology management, and deep health checks. Today, we launched cluster extensions, which bring the same approach to the software and settings on running nodes, with managed extensions for observability and user management. However, through all of it, you still keep full access to every node in your cluster, including the controller node. You can SSH in, configure nodes directly, and run your own lifecycle scripts. The APIs give you less to maintain, direct access gives you more control, and you choose the balance.
In this post, we walk through the features we introduced in 2026 and explain why the software on running nodes needed a different mechanism. We then show how cluster extensions work, through both the API and the console, and follow a platform team through a quarter on a cluster that uses them.
A declarative foundation for Slurm cluster operations
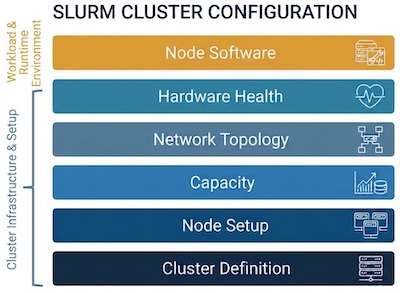
We can think of a Slurm cluster’s configuration grouped into six layers. Five of them describe the cluster itself: its definition, node setup, capacity, network topology, and hardware health. The sixth covers the software running on its nodes, which we discuss in the next section. The following figure shows the six layers.
Earlier in 2026, we brought declarative management to the first five layers. With API-driven Slurm configuration, administrators define node roles, partitions, and Amazon FSx for Lustre and Amazon FSx for OpenZFS mounts in CreateCluster and UpdateCluster requests, and connect an external accounting database. HyperPod updates partition settings while preserving other controller-node Slurm customizations. AMI-based configuration replaces routine setup scripts with images preconfigured with Slurm, Docker, Enroot, Pyxis, and home directories. A custom AMI or OnInitComplete script handles organization-specific software. Continuous provisioning for Slurm retries capacity requests in the background; AMI-based configuration works with it, minimum capacity requirements let teams specify MinInstanceCount, and cluster operations track scaling requests.
Automatic topology management maintains the network layout as nodes scale or are replaced. On Slurm 25.11 or later, partition-level topology supports tree or block topology per partition. For hardware health, on-demand deep health checks stress GPUs and test NVIDIA Collective Communications Library (NCCL) connectivity, while deep health checks with continuous provisioning run as nodes are provisioned. Nodes under check stay in Slurm maintenance reservations until checks finish, keeping jobs off them.
Introducing cluster extensions
The five layers described so far are configurations that HyperPod can derive or apply once, when it provisions a node. The sixth layer, the software that runs on the nodes, behaves differently because it keeps changing for the life of the cluster. As researchers join and leave, a team asks for deeper GPU metrics for a week, and an exporter ships a fix. For this layer, lifecycle scripts have been the main mechanism so far, and they have drawbacks when the software keeps changing. A script runs only when a node is provisioned, so each change means editing it and then replacing nodes or rerunning it across the fleet. A mistake shows only when the script runs on a node, and nothing reports what’s installed, so nodes drift apart over time.
We wanted the software to be declared in one place, checked when you submit it, kept consistent across nodes, and visible afterward. In November 2026, we launched cluster extensions, which are software packages managed by AWS that you install, configure, update, and remove through APIs or the Amazon SageMaker AI console, starting with observability and user management, including directory integration, as the first software extensions. Compared with scripts, extensions have these advantages:
- Validated up front: HyperPod checks an extension’s settings against its schema when you submit them, through the API or the console, so a misspelled setting is rejected before anything reaches a node.
- Consistent on every node: HyperPod applies the extension to every node, including nodes added by scale-up or replacement, and keeps the nodes consistent as the cluster scales and heals.
- Changed through the API or the console: You change a setting or upgrade a version with an API call, or from the SageMaker AI console, instead of editing scripts and replacing nodes. Both paths use the same validated configuration, and this post shows console screenshots alongside the API examples.
- Visible: Each extension reports its status and per-node health.
Use cluster extensions when HyperPod offers a managed software capability. Use custom AMIs and lifecycle scripts for organization-specific software or initialization that the available extensions don’t cover. HyperPod supports two cluster managed extensions today:
- The observability extension (sagemaker-observability) collects node, GPU, Elastic Fabric Adapter (EFA), Slurm job, and Slurm cluster metrics and sends them to Amazon CloudWatch or Amazon Managed Service for Prometheus.
- The user management extension (sagemaker-user-management) creates users and groups with the same IDs on every node, controls who can use SSH and sudo on each node type, and registers users with Slurm accounting. It can also connect the cluster to Active Directory, for example AWS Directory Service for Microsoft Active Directory.
The following diagram shows how an extension reaches your nodes.
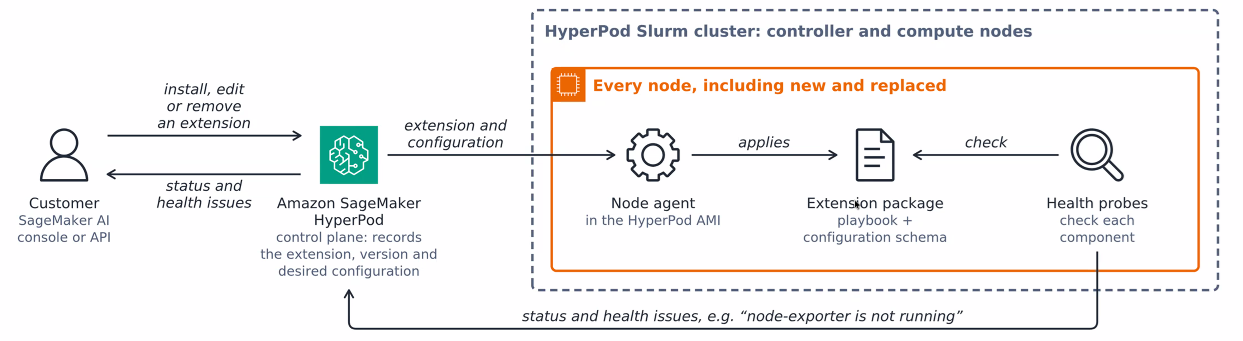
Figure 2: HyperPod can install, edit, or remove an extension. HyperPod records the desired configuration, a node agent applies the extension package on every node, including new and replaced ones, and health probes report status and health issues back
Using cluster extensions
You can use cluster extensions from the SageMaker AI console or through an API. On the console, the Extensions tab on a cluster’s details page lists each extension with its status, version, and ARN, and it’s where you install a new one. Each extension adds controls of its own, such as the metric store and an open dashboard in Grafana button for observability, and the number of users and groups and a Manage users button for user management. You can also manage every extension through APIs, from the AWS CLI or an SDK, to script installs, keep settings in version control, repeat a setup across clusters, or check status and health from your own tooling. The following table lists the six cluster extension APIs, from installing an extension to listing the versions you can upgrade to, along with console view for extensions.
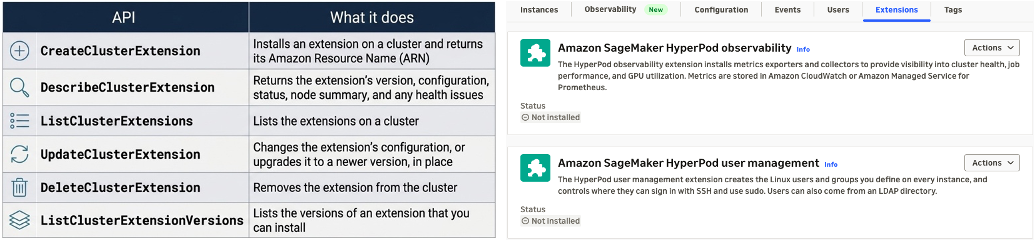
Figure 3: Left, the six cluster extension APIs and what each one does. Right, the console view to add and remove extensions
The following diagram shows what happens after you call one of these APIs.
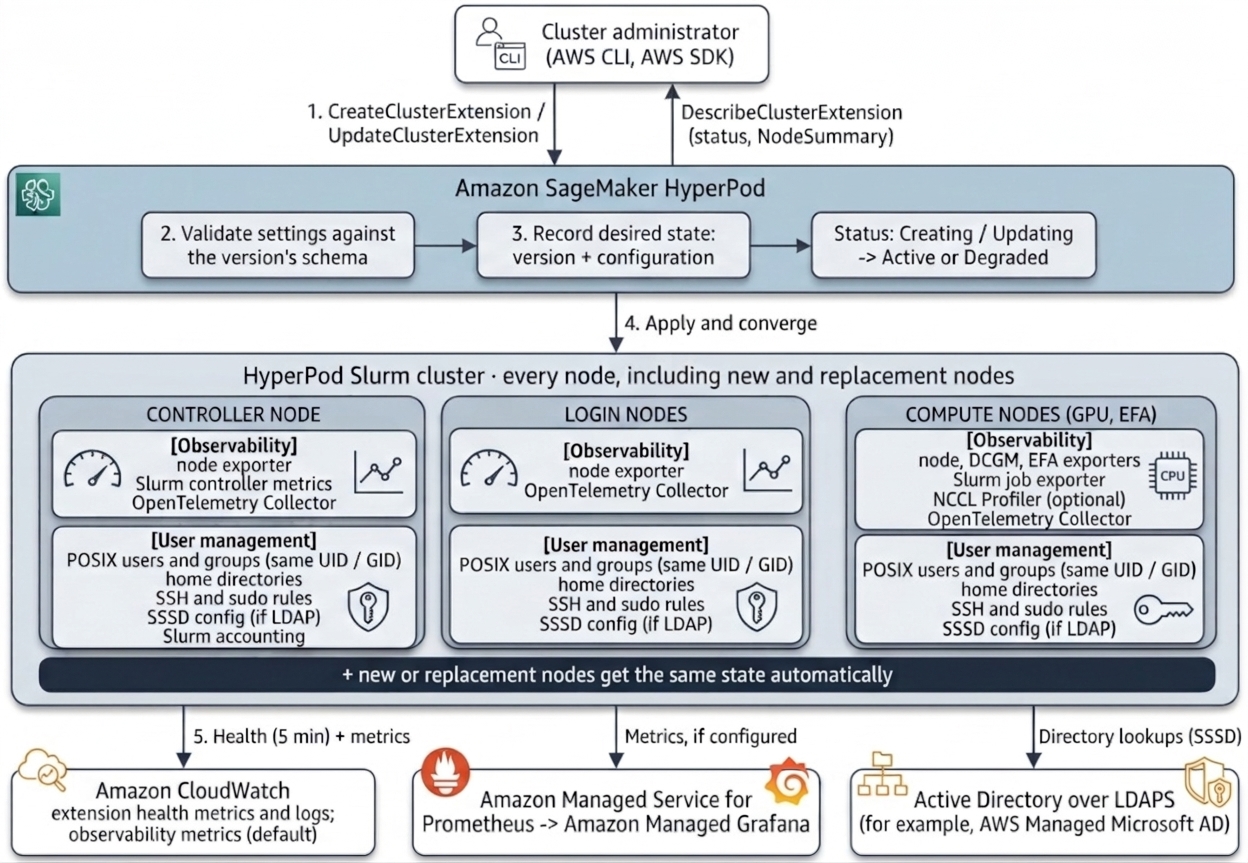
Figure 4: You declare an extension’s version and settings through the API. HyperPod validates and records them, applies them to every node for its role, and reports status and health
When you create or update an extension, HyperPod validates your settings against the version’s schema during the API call, so a misspelled setting is rejected immediately. It then records the version and settings as the desired state and applies them, with each node installing only what its role needs, such as GPU exporters on GPU nodes only. New and replacement nodes get the same state a few minutes after they start, and every node reports whether the extension applied and whether it’s healthy.
Updates send only the settings that you want to change, and HyperPod merges them into the stored settings. Problems that show up only on a node, such as a port or user ID that something else already uses, appear in the Health field of DescribeClusterExtension, grouped by cause with a code, a message, and a count of affected nodes. HyperPod retries internal failures on its own, and for anything else you fix the cause and call UpdateClusterExtension with no changes to retry the affected nodes.
An extension’s status is Creating or Updating while a change rolls out, Active when every node runs the requested version and settings and none reports a problem, and Degraded when some nodes failed or report a problem. Each extension has its own ARN, so a platform team can own sagemaker-user-management while a monitoring team owns sagemaker-observability. Each health issue names the component, describes the effect on your cluster, gives the next step, and counts the affected nodes, so you can see where to look without signing in to each node, as the following figure shows.
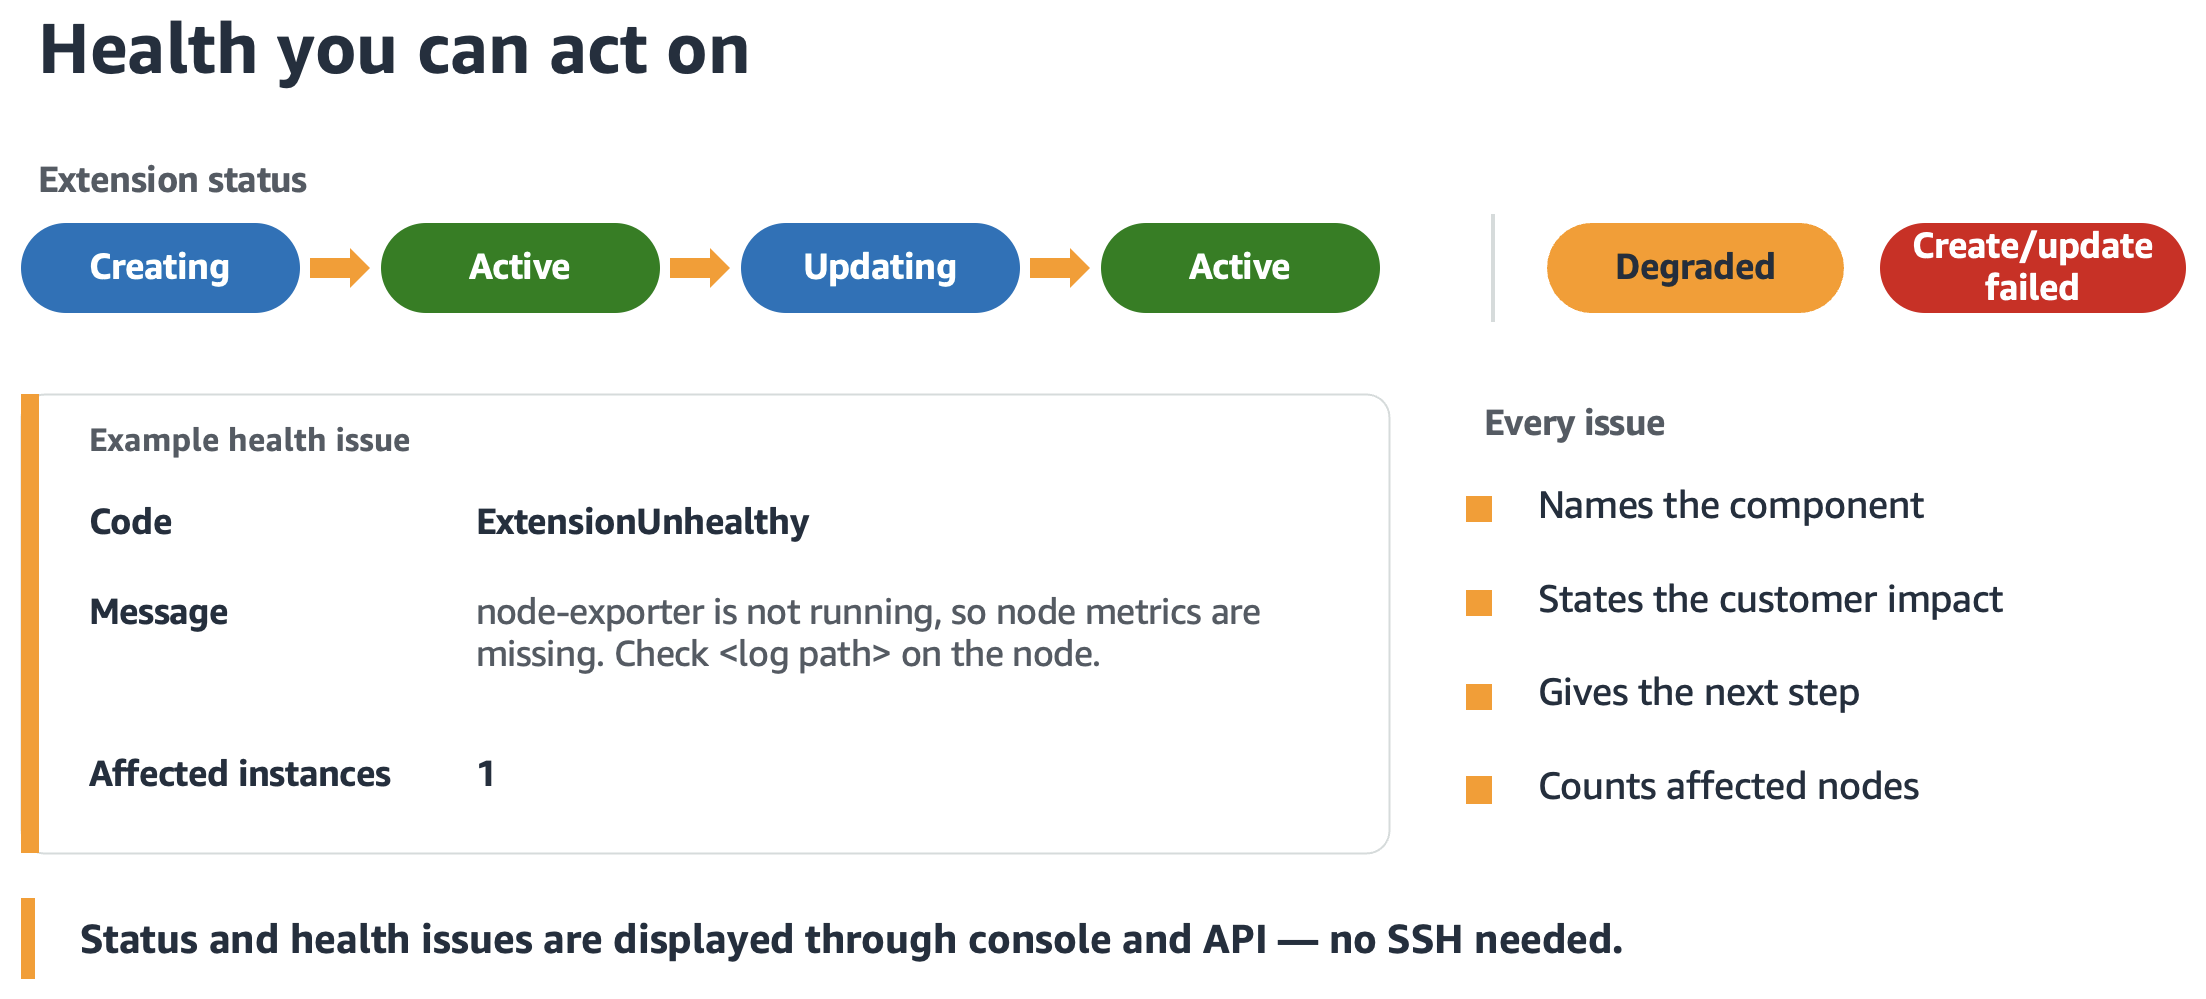
Figure 5: An extension’s status, and an example health issue for a node exporter that isn’t running
When to use cluster extensions and when to use lifecycle scripts
A useful way to decide is to ask who owns the software and how often it changes. Some of the software on a cluster is specific to your organization, such as security agents, license servers, and the storage layout your data pipeline expects. Lifecycle scripts and custom AMIs are the right tools for it, because only your team knows what it needs. The rest is software that almost every cluster needs, like GPU and job metrics and user accounts with consistent IDs and access rules. That software must match on every node and keeps changing, so cluster extensions are the better fit, because you declare it once, HyperPod validates it, and each extension reports whether it’s healthy.
The two approaches can coexist, but each component should have one owner. Don’t manage the same exporter, user, or service through both a lifecycle script and an extension, because competing configurations can cause installation or runtime conflicts. Cluster extensions work with every lifecycle configuration option.
If you already run these capabilities from scripts, you can move to extensions one capability at a time, and scripts and extensions can run side by side while you do. For each capability, the migration takes four steps:
- Call UpdateClusterSoftware to move the cluster to the November 2026 HyperPod AMI or later.
- Turn the capability off in your lifecycle scripts and upload them to your S3 bucket, so that new nodes skip it.
- During a planned maintenance window, stop and remove the script-installed agents on every node. This is the only manual, fleet-wide step.
- Call CreateClusterExtension to install the extension on the clean cluster.
If anything is left behind, the install names the conflict, such as a port that’s already in use, and DescribeClusterExtension shows it under Health. With user management, you keep the same usernames and user IDs. The following figure shows four steps.

Figure 6: Moving an existing cluster from lifecycle scripts to extensions, one capability at a time
What you need to get started with cluster extensions
You need a HyperPod Slurm cluster on or after the November 2, 2026 HyperPod AMI or later with continuous provisioning enabled. An extension runs software as root on every node, so treat CreateClusterExtension, UpdateClusterExtension, and DeleteClusterExtension as administrator permissions. We suggest that you do not grant them to the cluster’s execution role, because every user who can sign in to the nodes can use its credentials. That role does need access to the destinations that the extensions use, which means Amazon CloudWatch or aps:RemoteWrite for observability and secretsmanager:GetSecretValue for the Active Directory secrets that user management reads. If those secrets are encrypted with a customer managed AWS Key Management Service (AWS KMS) key, the role also needs kms:Decrypt on that key. User management also needs a shared file system, such as Amazon FSx for Lustre, for home directories.
For procedures, IAM policies, and configuration references, see Cluster extensions for Amazon SageMaker HyperPod Slurm clusters in the Amazon SageMaker AI Developer Guide.
A platform team’s journey managing a shared Slurm cluster using cluster extensions
To see how cluster extensions are used in practice, consider a platform team that manages a shared Slurm cluster for several research groups. The team needs a reviewable cluster definition, GPU and job metrics, corporate directory access, local accounts for a partner lab, and separate ownership of observability and user management. The following examples show how the team configures these capabilities and responds to routine changes and failures.
Create the cluster from one definition
The administrator declares the whole cluster, including node roles, partitions, FSx mounts, minimum capacity, deep health checks, and the external accounting database, in a single CreateCluster request. For a complete example request, see Getting started with SageMaker HyperPod using the AWS CLI.
The request has no lifecycle configuration, topology file, or Slurm configuration file. Each SlurmConfig gives its instance group a role, and the GPU group joins the train partition. AMI-based configuration sets up the nodes, and the security team’s compliance agent is already in the custom AMI. The GPU group asks for 8 nodes and requires 6, so jobs can start as soon as 6 are ready while HyperPod provisions the rest and health checks each GPU node as it arrives. HyperPod s