AI agents increasingly handle work that depends on what changed today, such as security advisories, product releases, prices, and regulations. A model’s training data can’t answer those questions, so agents need web search. For production use, teams also need results they can cite, and control over which sources count. They want search queries to stay inside their cloud environment because those queries often reveal internal work.
The Web Search API in Amazon Bedrock AgentCore is now available. It gives agents and applications current web results through a single API call, signed with the AWS credentials they already use. AWS serves every query from a web index that Amazon operates, and doesn’t send it to a third-party search engine.
Each result includes the page’s title, URL, publication date, and an extract relevant to the query. Requests can include or exclude domains, and limit results to a publication date range. On AWS Lambda, Amazon Elastic Container Service (Amazon ECS), or Amazon Bedrock AgentCore runtime, your agent calls the API with its execution role. There’s no search API key to store or rotate. Web Search on Amazon Bedrock AgentCore is also available through AgentCore Gateway, a capability of Amazon Bedrock AgentCore. There, one administrator source policy covers every agent and Model Context Protocol (MCP) client.
For LangChain developers, the AgentCore web search tool in LangChain’s AWS integration now calls the Web Search API. One function call gives an agent current, cited search results. The tool can also hold rules that the model can’t change, such as a date window, a source blocklist, and a search budget. It returns its results as data that your code can check. It works with LangChain agents, with LangGraph, the orchestration framework that runs them, and with Deep Agents, which adds subagents, a virtual filesystem, and context compression.
In this post, you build a daily dependency watch for a security team as a LangGraph graph on the Web Search API. Every morning, the watch checks whether anything new affects the open source packages and container base images the team ships. It researches three package ecosystems in parallel, while your code keeps the date window, the blocklist, and the search budget out of the model’s control. It checks each finding against the sources it cites and remembers what it already reported. Then you run the watch on AgentCore runtime, and offer it across teams through AgentCore Gateway. In our test, the three branches finished in 36 seconds, against 99 seconds one after another.
Solution overview
The model decides what to search for and writes the findings. Every rule that must hold, whatever the model does, stays in code: the date window, the blocklist, the search budget, and the checks on each finding. Figure 1 shows how these parts fit together when you run the watch from the notebook.
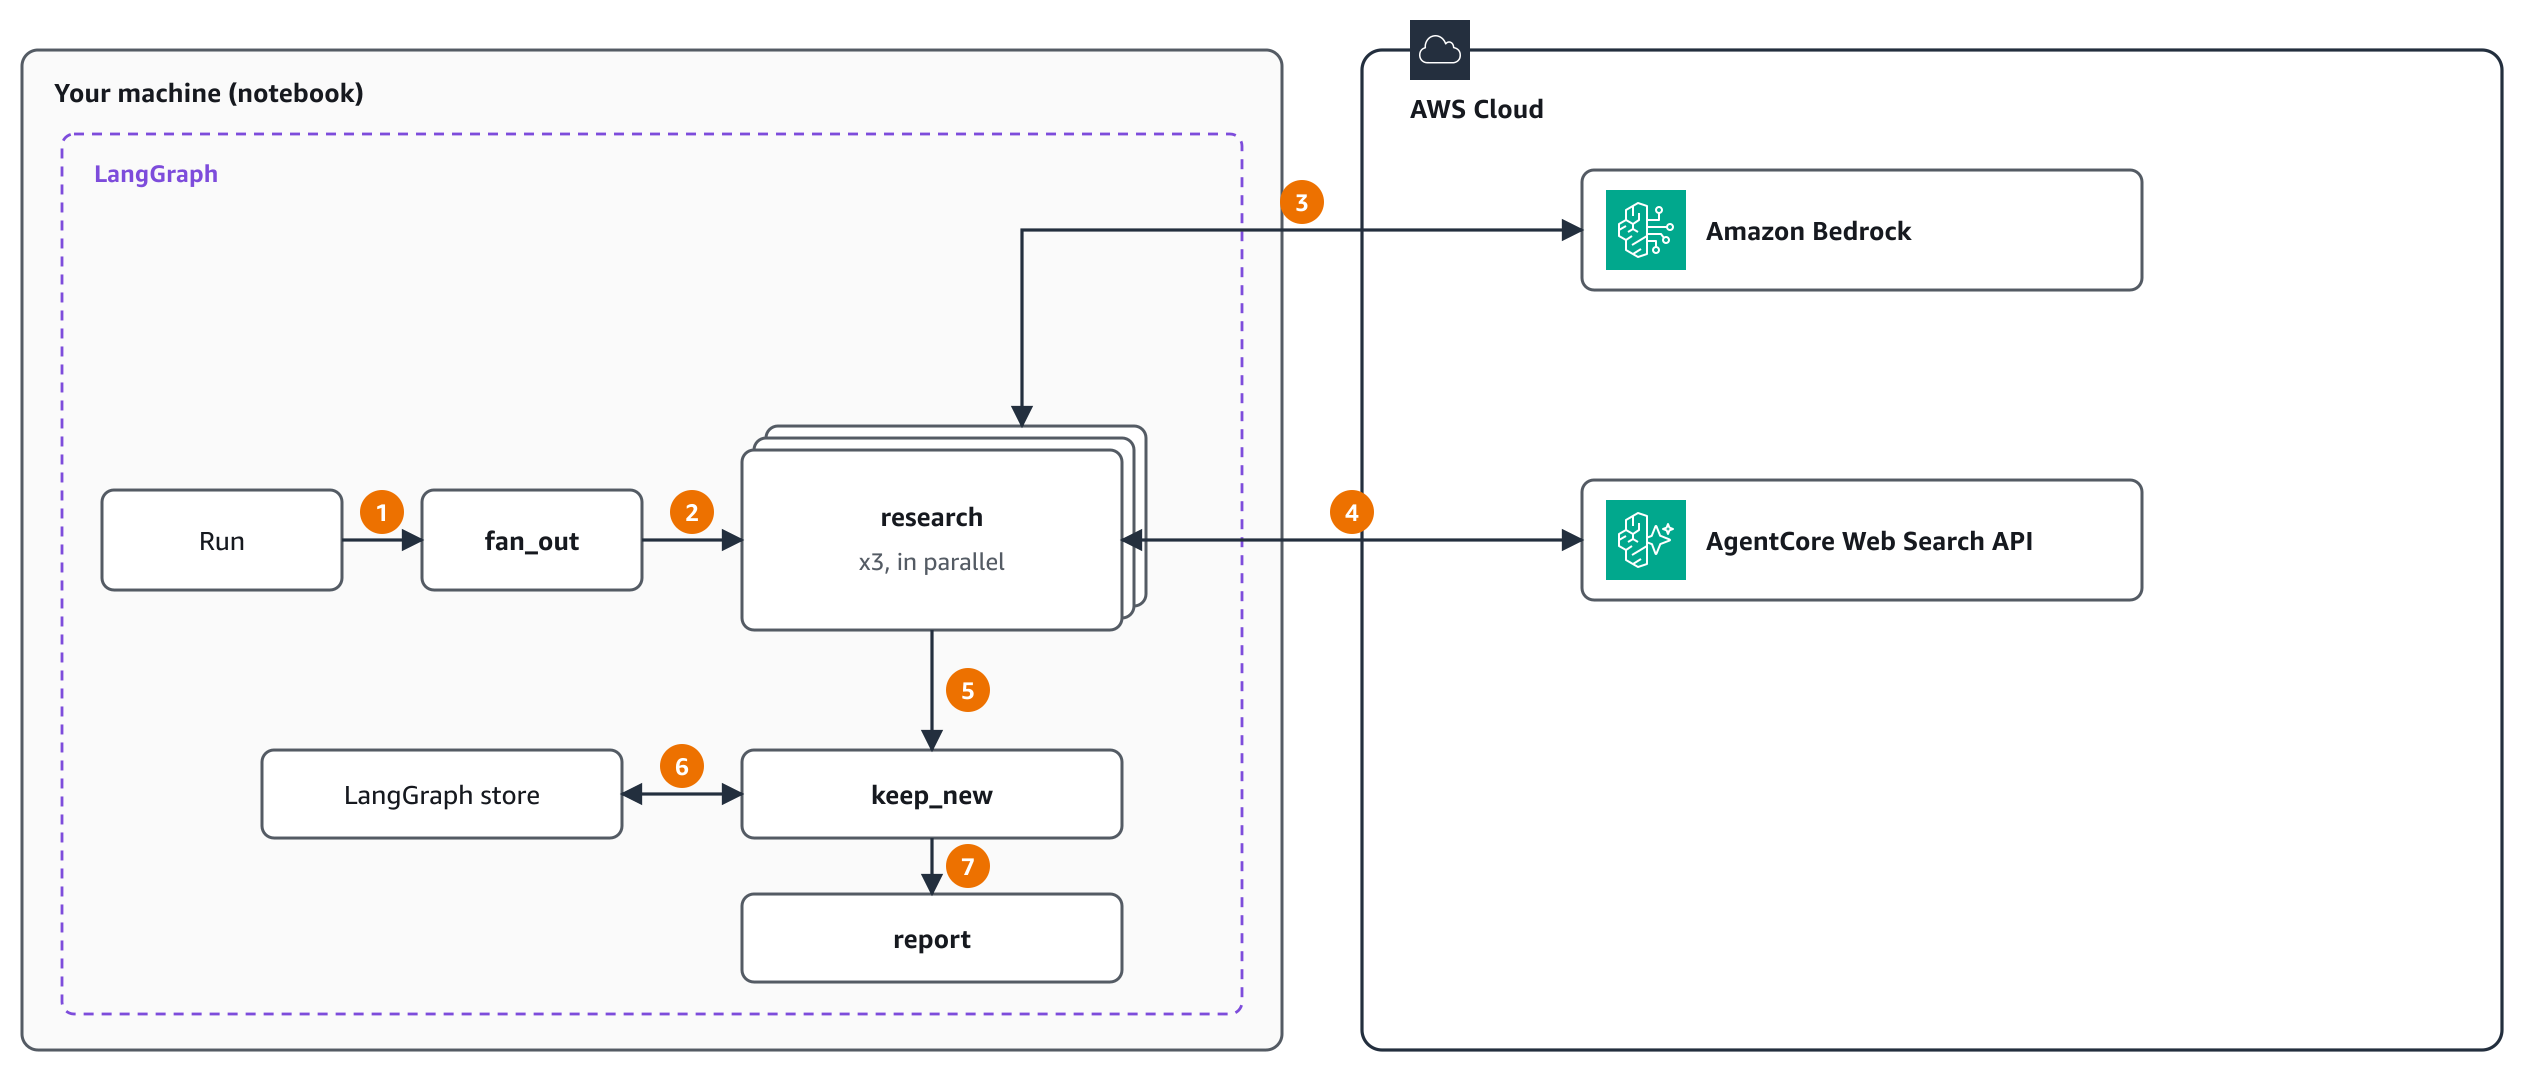
Figure 1: A daily dependency watch with LangGraph and the Web Search API, run from a notebook
The numbered steps:
- A run starts the graph with the watchlist and the watch window.
fan_outstarts one research branch per ecosystem: npm, PyPI, and container base images. LangGraph runs the three branches in parallel.- Inside each branch, the agent calls an Anthropic Claude model in Amazon Bedrock. The model decides what to search for and, at the end, produces structured findings.
- The branch’s search tool adds the date window and the blocklist to each query. It calls the Web Search API with a request signed with AWS Signature Version 4 (SigV4). Steps 3 and 4 repeat, up to four searches per branch, in every branch at the same time.
- Each branch keeps only findings that its sources support and that fall inside the window. When all three branches finish, LangGraph merges their findings and runs
keep_newonce. keep_newchecks the LangGraph store and records new findings, so nothing is reported twice.- report builds the cited table of new findings for the security team.
Prerequisites
Before you start, you need the following:
- An AWS account, working in an AWS Region that offers the Web Search API. The examples use the US East (N. Virginia) Region (us-east-1). For other Regions, see Supported AWS Regions.
- Python 3.10 or later.
- AWS credentials for the identity that runs the notebook, from environment variables or an AWS Command Line Interface (AWS CLI) profile. That identity needs the AWS Identity and Access Management (IAM) permission from Step 1 and access to an Anthropic Claude model in Amazon Bedrock.
- The following Python packages: boto3 1.43.127 or later, the AgentCore Python SDK (bedrock-agentcore) 1.26.0 or later, and langchain-aws 1.9.3 or later. Install them with this
pipcommand:pip install -U "boto3>=1.43.127" "bedrock-agentcore>=1.26.0" "langchain-aws[tools]>=1.9.3" langchain langgraph
Web Search and model calls are billed per use. For details, see Amazon Bedrock AgentCore pricing. One run of the watch makes at most 12 searches.
The complete code is in this notebook. The notebook runs every cell, including setup. The following steps cover the parts that matter for search.
Step 1: Grant the permission
First, give the identity you run as permission to search. The Web Search API needs one IAM action on one resource that AWS owns, so the statement is the same in every account. (For the full setup, see Grant permission to call the API.) This uses the same permission that a gateway’s service role uses for web search:
{
  "Effect": "Allow",
  "Action": "bedrock-agentcore:InvokeWebSearch",
  "Resource": "arn:aws:bedrock-agentcore:us-east-1:aws:tool/web-search.v1"
}
Step 2: Build a search tool with fixed rules
Now build the search tool that each research branch uses. The watch can’t let the model choose the date window, the trusted sources, or the number of searches. The graph also needs the returned sources as data, to check findings against them later. The web search toolkit in the langchain-aws package covers all of that with its options:
toolkit, tools = create_web_search_toolkit(
    region="us-east-1",
    exclude_domains=BLOCKLIST,
    published_after=window_start.strftime("%Y-%m-%dT%H:%M:%SZ"),
    model_filters=False,
    max_searches=4,
    return_sources=True,
)
With no gateway argument, the tool calls the Web Search API. Every search carries the blocklist and the date floor, and a model’s own arguments could only narrow them. With model_filters=False, the model sees only a query argument. The tool stops after four searches, and it returns the results twice: as text for the model, and as an artifact for the graph. Each branch creates its own toolkit, so the branches search in parallel. You can give the same tools to a Deep Agents subagent.
Step 3: Define the findings schema
With the search tool in place, define what each branch returns. Each branch is a create_agent agent with a Pydantic schema as its response format, so it returns findings instead of prose. A finding has the package, a one-line title, and the CVE or advisory ID if the source gives one. It also has the severity that the source states, whether the source says it’s exploited, a recommended action, and the source URL. The notebook has the full schema and prompt.
Step 4: Build the graph and its evidence check
Now assemble the graph. fan_out sends one branch per ecosystem with the Send API in LangGraph, so the branches run in parallel.
Before a branch returns, code runs four checks on every finding. The checks compare the finding with what that branch’s own searches returned:
- The cited URL came back from one of the branch’s searches.
- The source’s title or text names the package as a whole word.
- Any CVE or advisory ID in the finding appears in that text.
- The source’s publication date falls inside the watch window. The artifact carries each date already parsed, and a missing date counts as outside.
After all branches finish, keep_new compares the surviving findings with a LangGraph store, and report builds the table. These checks catch an unsupported URL, a source that doesn’t name the package, an invented ID, and an out-of-window source. They don’t confirm severity, exploitation status, affected versions, or the recommended action. They also don’t prove when an issue was first disclosed: a page that the index dates this week can describe an older incident. For a production security workflow, verify findings against authoritative vulnerability feeds. Have someone review a finding before anyone acts on it.
Step 5: Run the watch
You’re ready to run the watch with a 7-day window. In our run, the three branches made 12 searches and got 80 sources back. They finished in 36 seconds of wall time, against 99 seconds for the branches added together. The evidence check dropped two findings: one whose source didn’t name the package, and one whose CVE ID didn’t appear in its source. None of the sources came from the blocked domain.
Four findings passed the checks, and keep_new reported two of them. Earlier test runs had already reported the other two, so the store held them back. Figure 2 shows the run in LangGraph Studio, the visual debugger for LangGraph. Every row of the report links to its source, which the Web Search acceptable use terms require for any output shown to users.
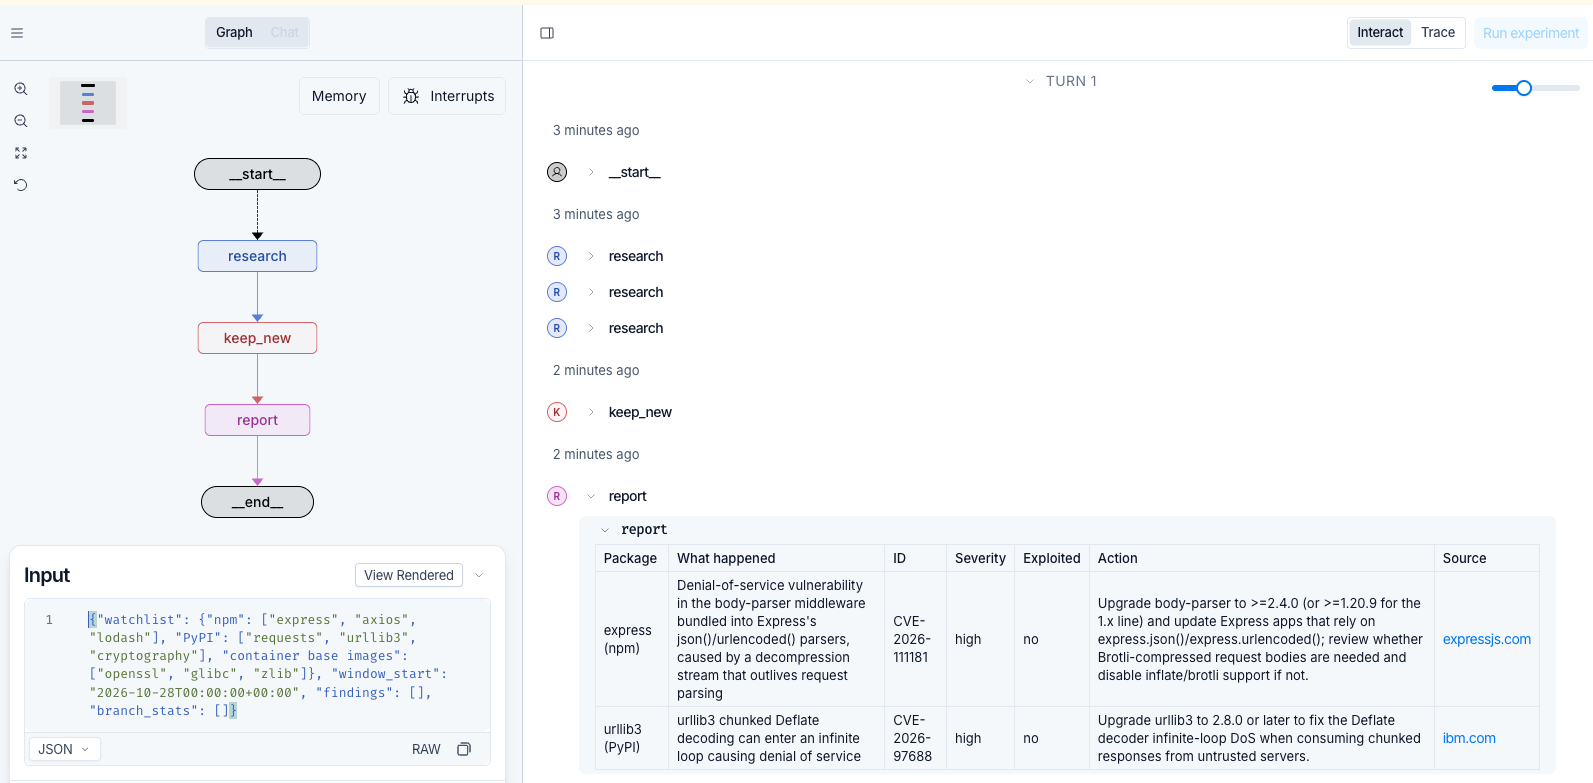
Figure 2: A run of the dependency watch in LangGraph Studio. The three research entries on the right are the three ecosystem branches, which LangGraph ran in parallel. The report lists only findings that passed the evidence check and weren’t reported before, each linked to its source
Step 6: Run the watch again to see only new findings
Finally, run the watch a second time to see the store at work. A scheduled watch runs every day, and the team shouldn’t see the same advisory twice. In our second run, the branches searched again and kept two findings, and the store had reported both before. So the report had nothing new, as Figure 3 shows.
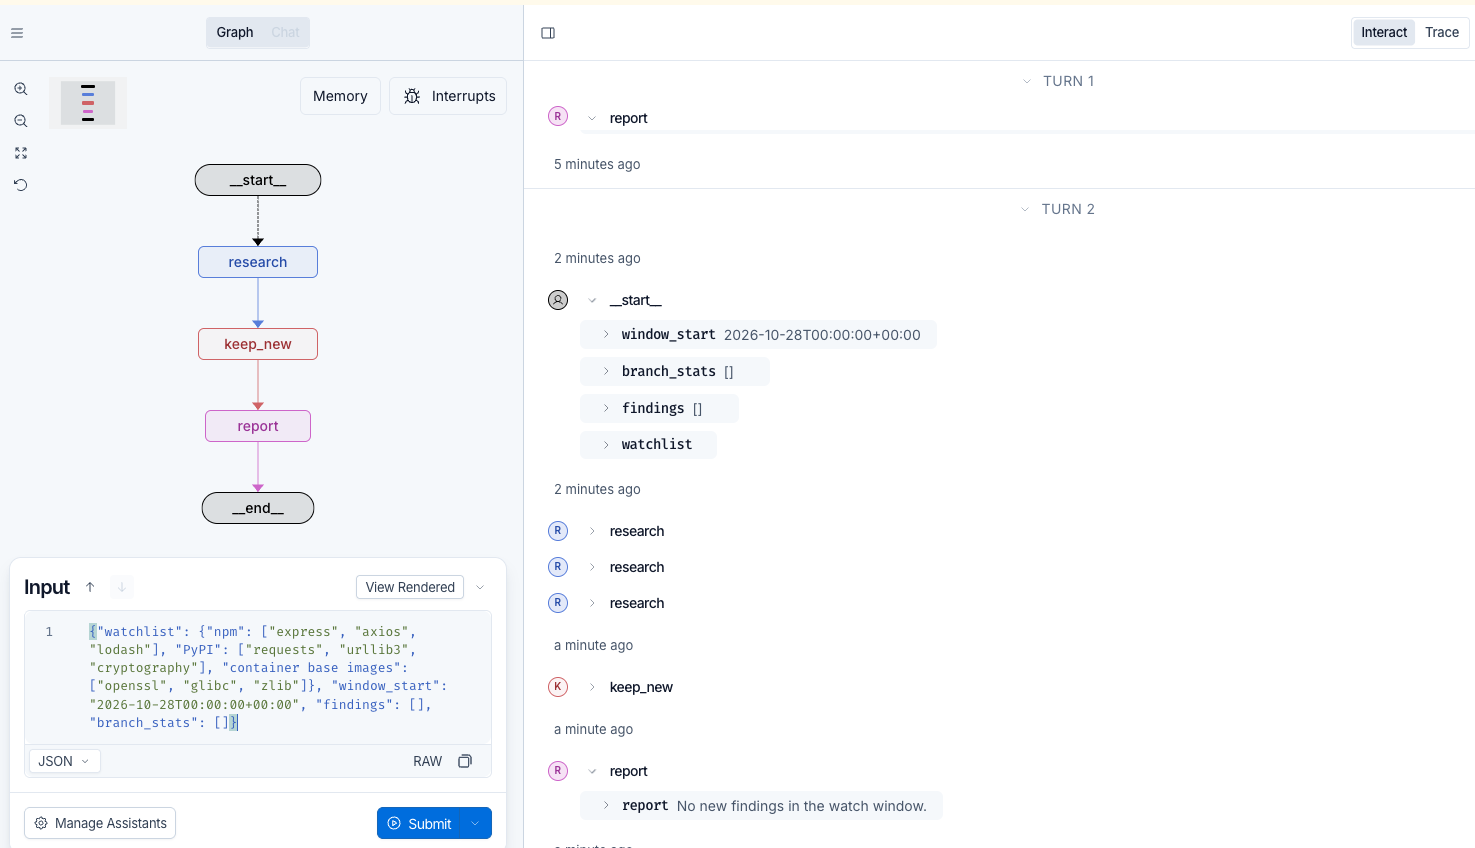
Figure 3: A second run with the same input. The branches search again, but keep_new finds every result already in the LangGraph store, so the report has nothing new
For a scheduled job, swap InMemoryStore for a durable store with exact key lookups, such as DynamoDBStore from langgraph-checkpoint-aws.
Add web search to an existing LangChain or Deep Agents app
If you already have a LangChain agent, adding web search takes a few changes. Check these before you deploy:
- Permission: add the Step 1 statement to the identity or execution role that your app already runs with. Nothing else needs to be created.
- Region: the toolkit’s Region must offer the Web Search API, and it can differ from the Region of your model or the rest of your app.
- Tool name: the tool is named
web_search. If your agent already has a tool with that name, such as another search provider, set a different name on the tool before you add it. - Rules and budget: each toolkit carries its own filters and search budget. Create one toolkit for each agent or branch that needs separate rules or its own budget.
- Throughput: all agents in an account share its Web Search quota, so parallel branches add up. By default, an account can send 10 requests per second in each Region. For details, see Quotas for Amazon Bedrock AgentCore.
With Deep Agents, you define the agent with create_deep_agent: a model, tools, a system prompt, and subagents. Pass the toolkit’s tools in a subagent’s tools list. Set the rules as toolkit options, because the tool applies them on every search, whatever the model asks. To check findings against their sources, as in Step 4, run that check on the agent’s output or add it as middleware. In our test, a Deep Agents coordinator delegated to a researcher subagent with these tools and returned a cited answer in about a minute.
Take it to production on AgentCore runtime
When you’re ready to run the watch every day without a notebook, host it on AgentCore runtime. Runtime runs agents built with any framework, including LangGraph, without a rewrite. It offers two compute types behind the same APIs. MicroVMs, the default, give each session its own isolated microVM, so one run can’t see another’s data. Instances run your agents on AWS-managed Amazon Elastic Compute Cloud (Amazon EC2) instances in your own account. They fit multi-day sessions, GPU workloads, or several agents that share one instance.
For the limits of each, see Use isolated sessions for agents and Runtime Instances and capacity providers. The Runtime sample next to the notebook holds the same graph as a Runtime entrypoint. Its policy grants the Runtime execution role the Step 1 permission and no broader access. Its README walks through creating, deploying, and invoking the project with the AgentCore CLI, on either compute type.
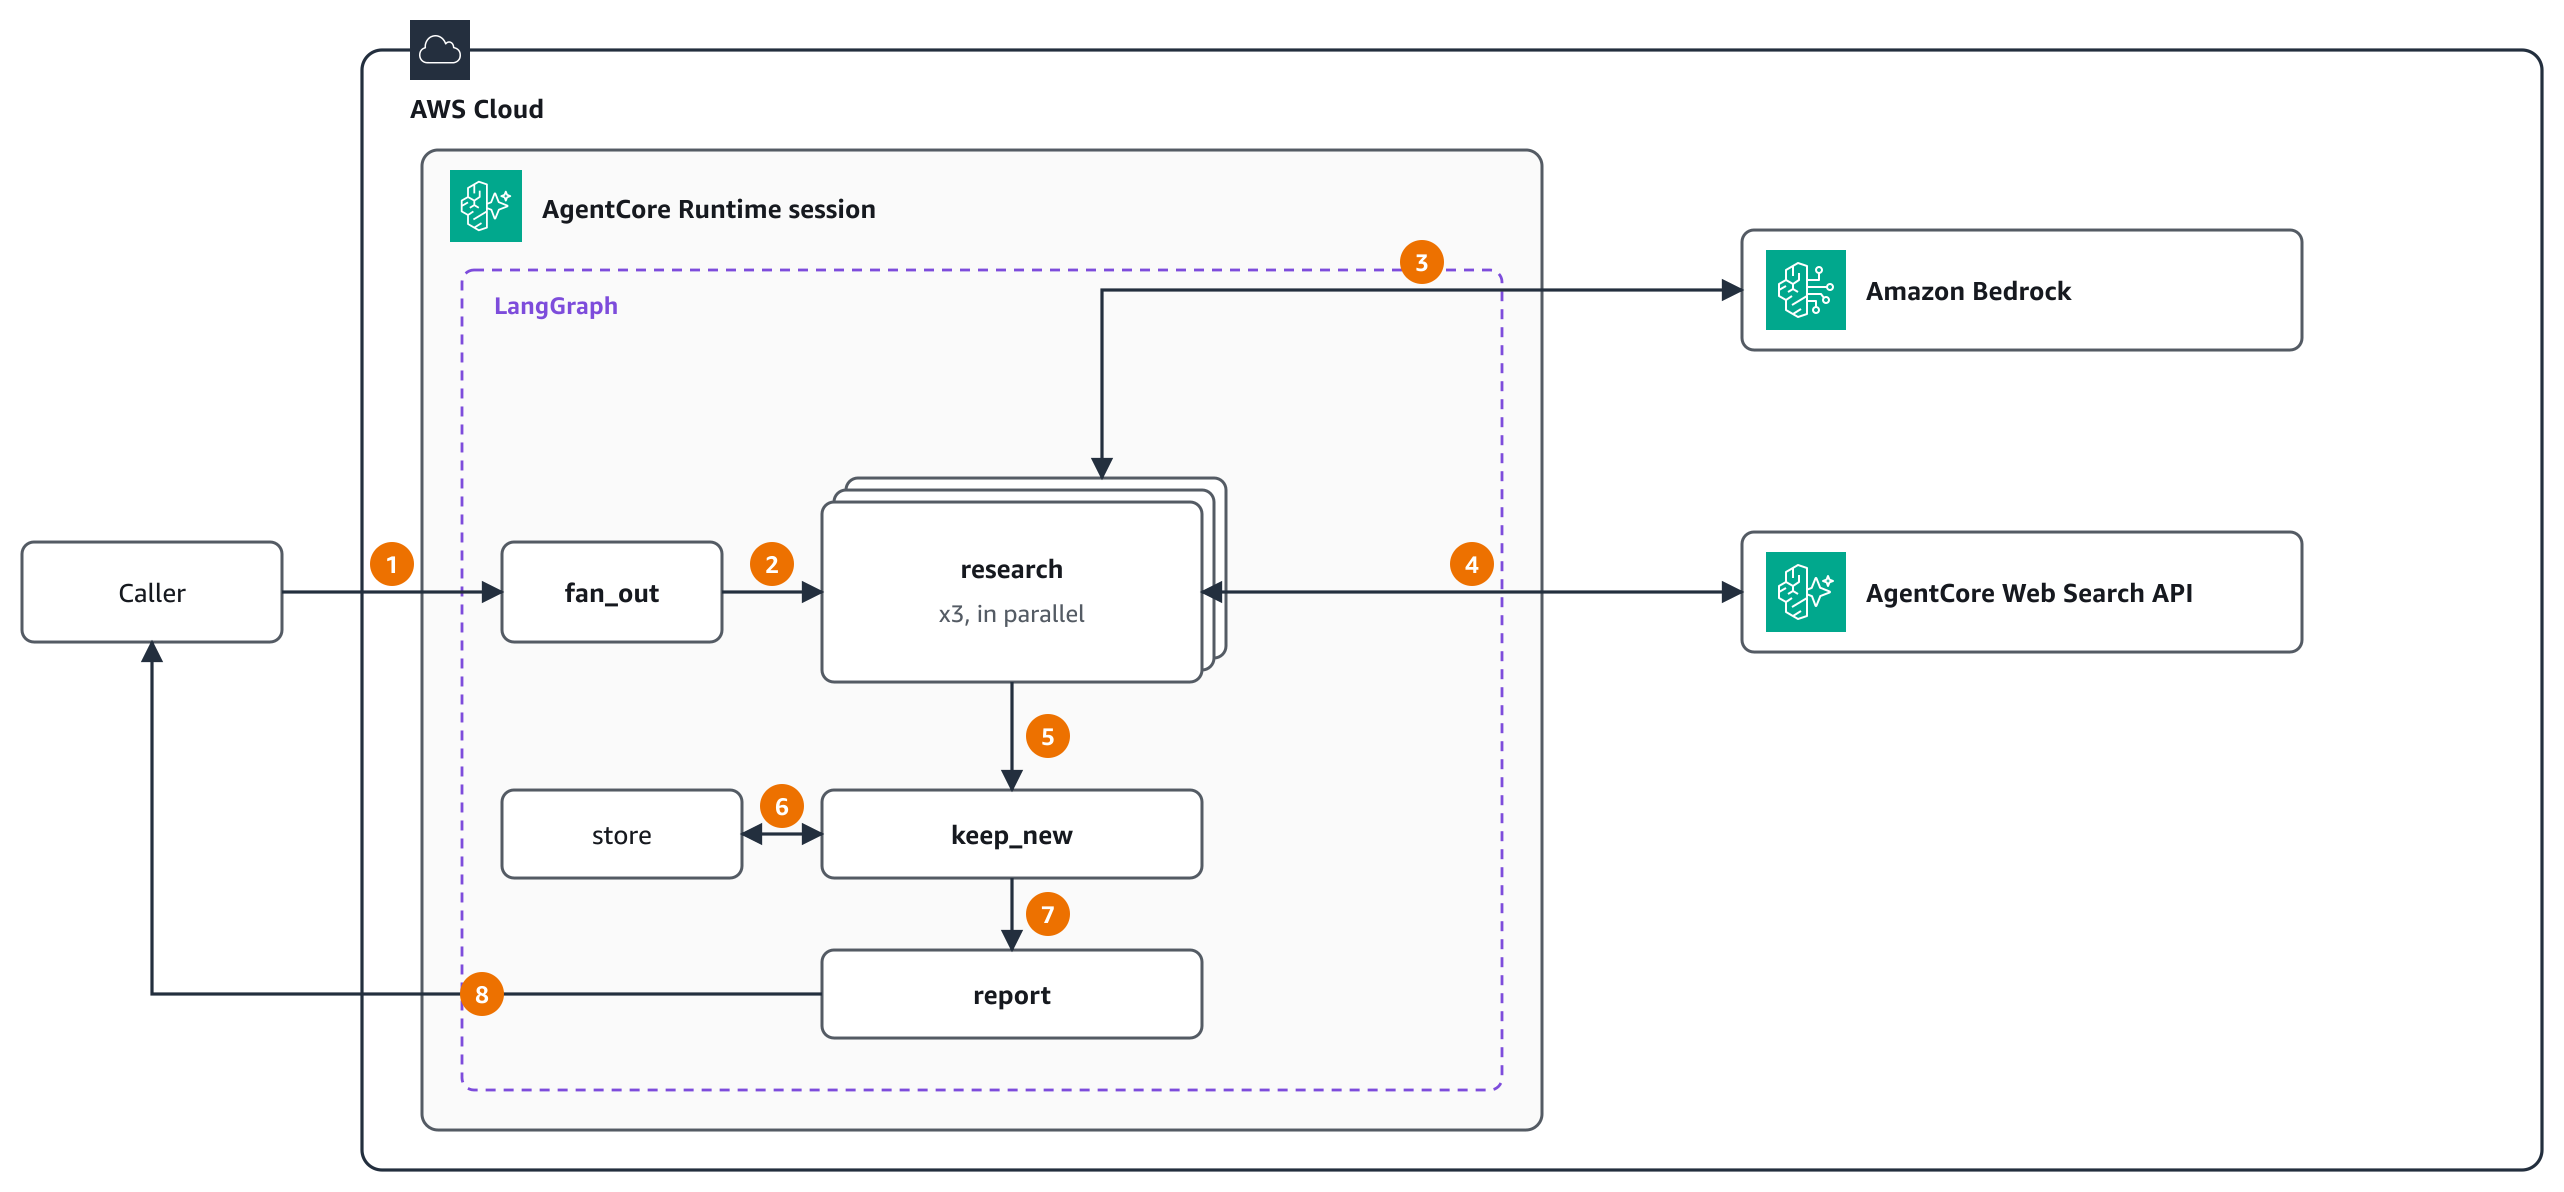
Figure 4: The same dependency watch hosted on AgentCore runtime. Steps 2 to 7 match Figure 1, with each search signed by the Runtime execution role. At step 1, a ca