Each Model Context Protocol (MCP) tool invocation on Amazon Quick is an access event that can require defense-in-depth authorization at the tool and parameter level. This applies in addition to a valid token. Without granular controls, a single misconfigured permission can bypass the access requirements that organizations might need to fulfill for compliance purposes. In this blog post, you implement a multi-gate authorization pattern that evaluates OpenID Connect (OIDC) JSON Web Token (JWT) claims in sequence. The pattern enforces role-based and attribute-based access control on each invocation. You configure which authorization controls to activate based on your compliance requirements, from group-based permissions to parameter-level attribute checks. Microsoft Entra ID serves as the identity provider (IdP) for this walkthrough.
When you connect MCP tools to Amazon Quick, a valid single sign-on (SSO) confirms who the caller is but not what they should be allowed to do. Authorization closes that gap, turning a verified identity into a set of enforceable rules about what each caller can reach. Model Context Protocol (MCP) is an open protocol that connects applications to internal tools, databases, and APIs, reducing the need for custom integrations. However, the moment those tools reach sensitive data, a valid SSO token is no longer enough. Without layered, defense-in-depth authorization, a single over-broad token can reach tools and data beyond the caller’s role, which can expose data and complicate compliance audits.
When an organization connects sensitive data sources to Amazon Quick through MCP, “authenticated” no longer equals “authorized.” Authorization decides which tools a caller can invoke, from which locations, and at what privilege level. For example, a regulated organization requires multi-factor authentication (MFA) at sign-in and restricts access from unapproved countries. The identity provider enforces the first requirement, and the authorization layer enforces the second. Standard OAuth 2.0 identity verification doesn’t enforce what callers can do at the tool and parameter level.
This post explains how the multi-gate authorization pattern works and walks you through configuring the identity layer that drives it. The interceptor processes OpenID Connect (OIDC) JSON Web Token (JWT) claims through four gates: MFA, geographic restriction, group-to-role mapping, and tool-level permission checks. In this walkthrough you configure the Microsoft Entra ID applications, claims, and policies the gates rely on. You then connect Amazon Quick to an existing Amazon Bedrock AgentCore Gateway, a capability of Amazon Bedrock AgentCore. The gateway provides the HTTP endpoint and JWT validation layer between clients and MCP tools. You validate the allow and restricted paths by signing in as different personas. This walkthrough assumes you have already deployed the AWS components, including the gateway, the interceptor AWS Lambda function, the tool Lambda functions, and the Amazon DynamoDB tables. You get an auditable, composable security layer that sits between the user’s natural-language request and your business logic.
Solution overview
This blog post uses a fictional example: AnyCompany Global Services, an enterprise that maintains a multi-tenant risk register hosted on Amazon DynamoDB accessed through MCP tools on Amazon Quick. This pattern is relevant for financial services, healthcare, and government organizations that can require granular access controls for compliance audits.
AnyCompany requires that each tool invocation comes from an authenticated caller who has completed MFA. Callers connecting from unapproved countries are denied access. Role-based permissions enforce a strict read/write boundary: readers can query risks but can’t create, update, or delete them, while administrators can bypass conditional gates for operational flexibility. Finally, every mutation must produce an immutable audit record to satisfy compliance and forensic requirements.
The multi-gate authorization user flow shown in Figure 1 addresses each of the preceding requirements. You implement it through a single AWS Lambda REQUEST interceptor attached to Amazon Bedrock AgentCore Gateway. The interceptor evaluates JWT claims in a fixed sequence, and each gate operates independently.
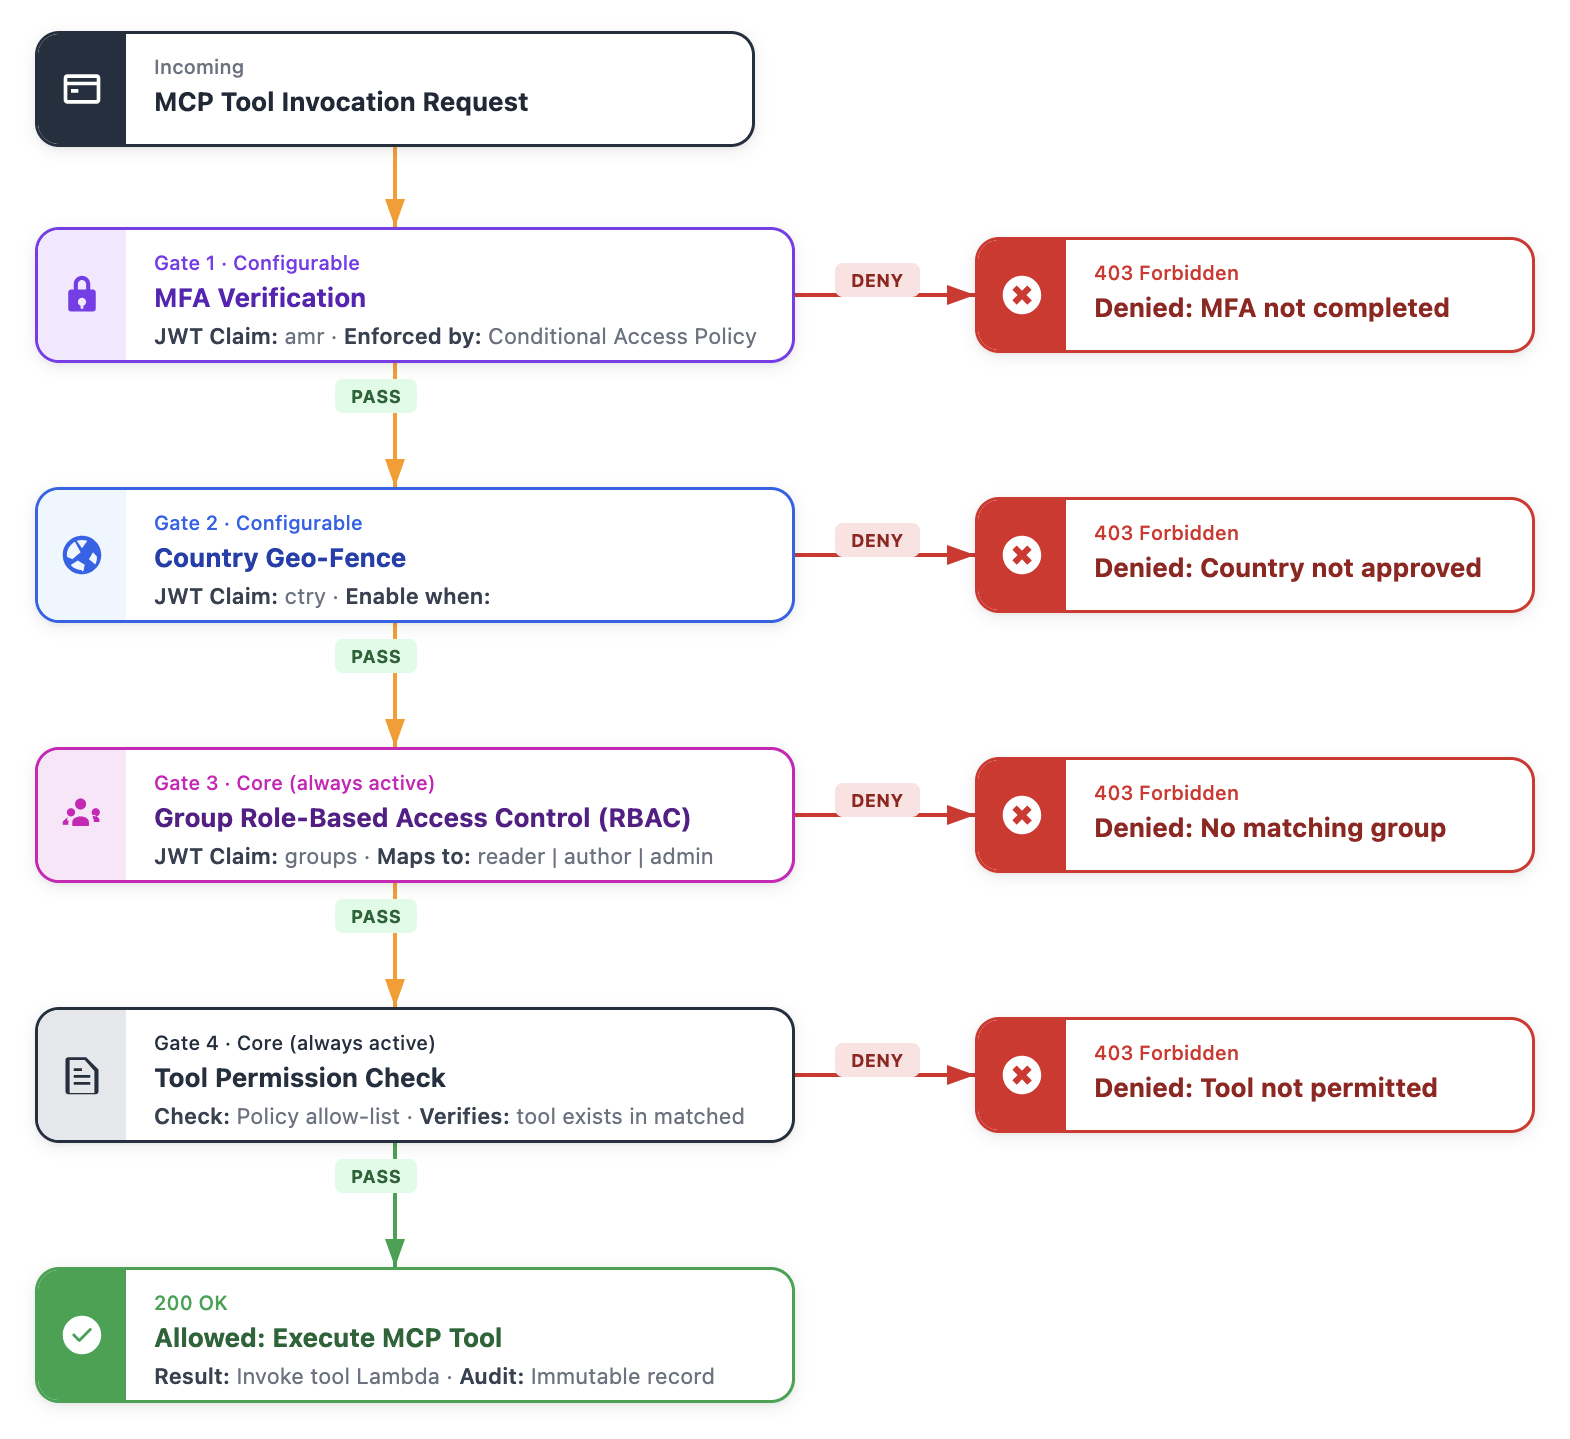
Figure 1: Multi-gate authorization user flow
The authorization gates process requests in this order:
| Gate | Name | JWT Claim | Purpose | Active when |
| 1 | MFA verification | Enforced by Identity Provider (IdP) | Require MFA before token issuance | Conditional Access Policy |
| 2 | Country geo-fence | ctry | Restrict access to approved countries | REQUIRE_COUNTRY=true |
| 3 | Group role-based access control (RBAC) | groups | Map group membership to reader, author, or admin policies | Always (core gate) |
| 4 | Tool permission | Policy allowlists | Verify the requested tool exists in the matched policy | Always (core gate) |
Each gate is independently configured through environment variables. Gates 3 and 4, group role-based access control (RBAC) and tool permission, form the core authorization layer and are always active. The remaining two gates are conditional and can be disabled by setting the environment variables to false or by omitting them entirely. This means a deployment requiring only RBAC and geo-fencing activates three gates. A deployment requiring further granularity and control can activate each of the four checks.
Gate 1 is the only gate that is enforced outside the interceptor. Entra ID applies the Conditional Access Policy before it issues a token, so every token that reaches the gateway has already satisfied MFA. Setting REQUIRE_MFA turns on an additional check of the amr claim inside the interceptor, for identity providers that record MFA evidence in the token. The two mechanisms work together: the policy keeps unverified callers out, and the claim check confirms in the request path that the token carries the evidence.
The interceptor evaluates all four authorization gates before business logic runs. A request that fails a gate is denied with a 403 and doesn’t reach the tool or its data. Each mutation that passes writes an immutable audit record, giving you a complete, queryable trail of who did what.
Before deploying the solution, set up your identity provider.
Prerequisites
This walkthrough assumes familiarity with AWS Lambda, OAuth 2.0 authorization flows, and Microsoft Entra identity provider configuration. You also need access to a few AWS services and an OIDC identity provider, described in the following sections.
AWS services access
This walkthrough assumes the AWS side of the pattern is already deployed in your account. That side comprises an Amazon Bedrock AgentCore Gateway configured with a CUSTOM_JWT authorizer, the AWS Lambda REQUEST interceptor, the tool Lambda functions, and the Amazon DynamoDB tables they use. Deploying those resources is outside the scope of this post, which focuses on the identity and authorization configuration.
Identity provider setup
This walkthrough uses Microsoft Entra ID as the identity provider. The authorization pattern works with OIDC-eligible identity providers. However, the configuration steps vary based on the identity provider you choose. You need the following in your Entra ID tenant: a Global Administrator or Application Administrator role to create app registrations, security groups, and the Conditional Access Policy that enforces MFA. Conditional Access Policies need a Microsoft Entra ID P1 or P2 license. For validation, prepare at least three test users with different group memberships.
Deploy the Entra ID applications
The following sections walk you through registering the two app registrations, exposing the API, and wiring up permissions. You also configure the claims the AWS Lambda interceptor reads to control permissions on the MCP tools. Throughout, replace the placeholder identifiers ({TENANT_ID}, {RESOURCE_APP_ID}, {GATEWAY_URL}, and so on) with the values from your own tenant.
Amazon Quick uses Proof Key for Code Exchange (PKCE) and RFC 8707 Resource Indicators, a standard for binding tokens to specific API endpoints. Together they scope each access token to a specific MCP server. During the token exchange, Amazon Quick sends the AgentCore Gateway URL as the resource parameter. Entra ID requires the client and resource represented by separate app registrations when the resource is identified by a URL.
Configure the resource application
Steps 1 through 3 register the resource application, set its Application ID URI, and expose the API scopes that Amazon Quick requests.
Step 1: Register the resource application (AnyCompany-MCP-Authorization)
The resource application represents the protected MCP API. Its access token is the token that AgentCore Gateway validates.
- In the Microsoft Entra admin center, go to Entra ID > App registrations and choose New registration.
- For Name, enter
AnyCompany-MCP-Authorization. - Under Supported account types, select Accounts in this organizational directory only (single tenant).
- Keep Redirect URI empty (the resource app does not handle sign-in redirects). Choose Register.
Figure 2 shows the completed registration form for the resource application, with the name entered and single-tenant selected.
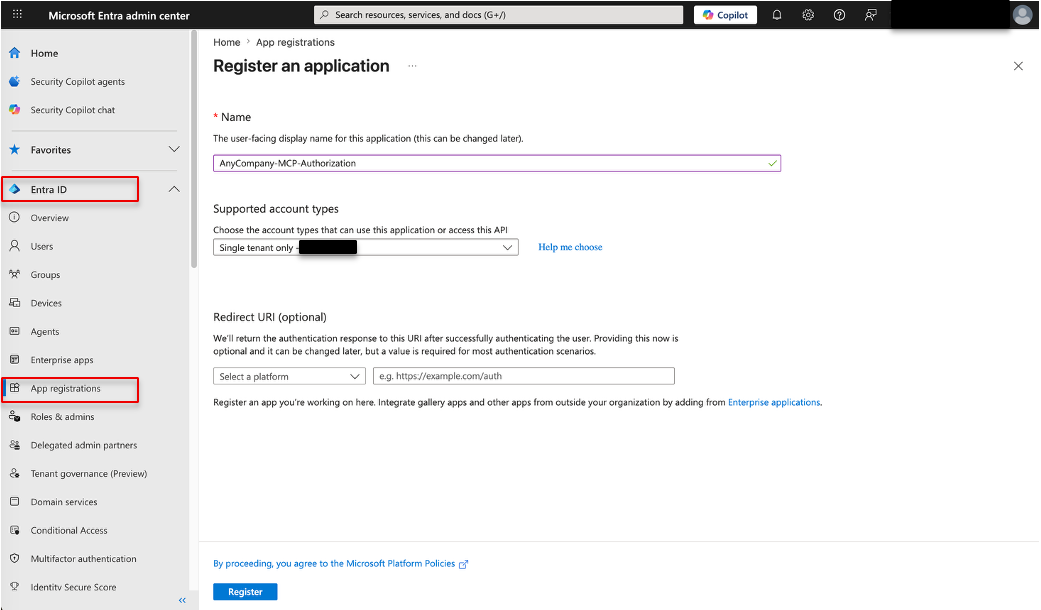
Figure 2: Resource application registration
- On the application Overview page, note and copy the Application (client) ID, Object ID, and the Directory (tenant) ID. You need these values later.
Figure 3 shows the Overview page, where the Application (client) ID, Object ID, and Directory (tenant) ID appear.
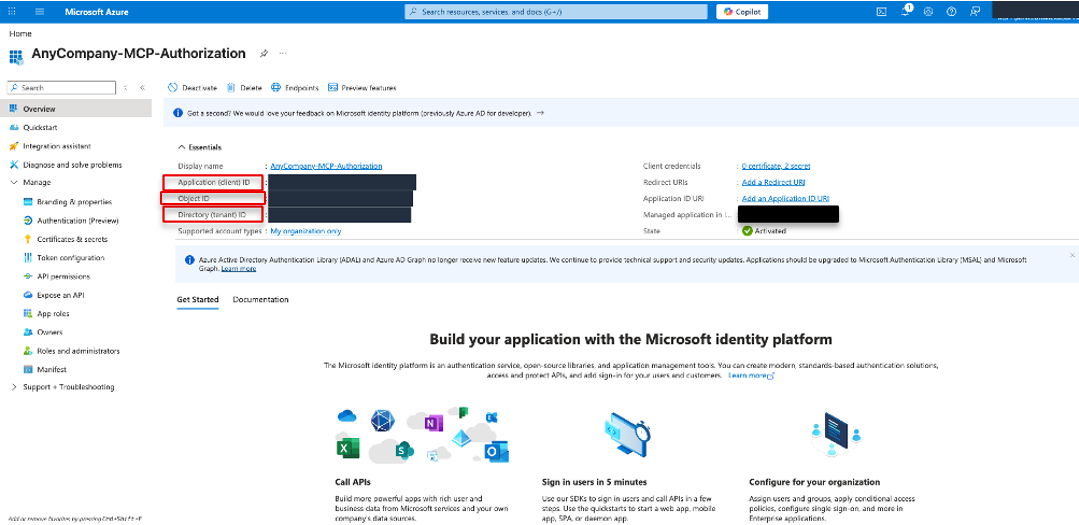
Figure 3: Resource application overview in Microsoft Entra ID
Step 2: Set the Application ID URI and token version using Microsoft Graph API
The next two settings on the resource application are applied through the Microsoft Graph API:
- Application ID URI: the identifier is a full URL (the AgentCore Gateway URL), so you set
identifierUristhrough the Graph API. - Access token version: the pattern requires a v2.0 access token, so you update the Microsoft Graph
apiattribute underapi.requestedAccessTokenVersion.
You can apply both in a single PATCH against the application object. Use the application’s Object ID (distinct from the client ID), which you noted in Step 1.
Option A: Microsoft Graph Explorer
- Open Microsoft Graph Explorer and sign in as an administrator. Consent to the
Application.ReadWrite.Allscope when prompted. - Set the method to PATCH and the URL to
https://graph.microsoft.com/v1.0/applications/{OBJECT_ID}. - Set the request body to the following, replacing {GATEWAY_URL} with your gateway URL (for example, api://{RESOURCE_APP_ID} or the full gateway endpoint, depending on your tenant policy):
{ "identifierUris": ["{GATEWAY_URL}"], "api": { "requestedAccessTokenVersion": 2 } } - Choose Run query. A 204 No Content response indicates success.
Figure 4 shows the PATCH request in Microsoft Graph Explorer and the 204 No Content response that confirms it succeeded.
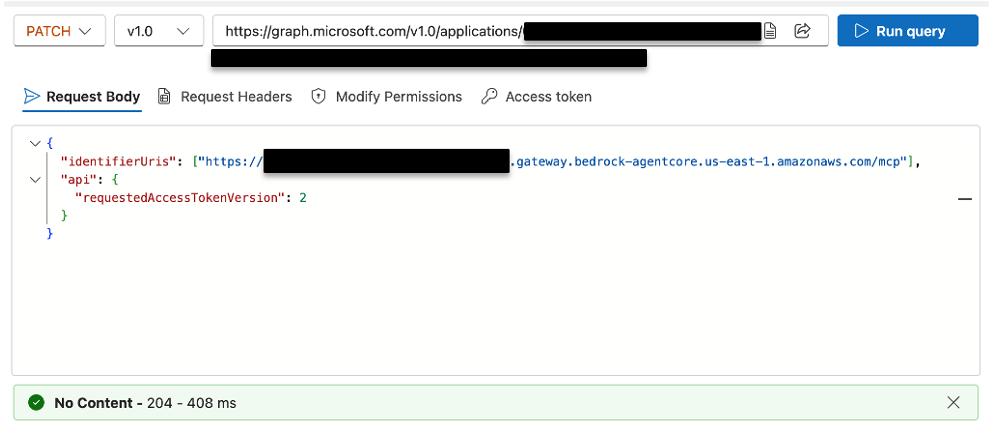
Figure 4: Microsoft Graph Explorer PATCH request
Option B: Azure CLI
- Sign in to the tenant with the Tenant ID from Step 1.
az login --tenant "{TENANT_ID}" --scope "https://graph.microsoft.com//.default" - PATCH identifierUris and the requested access token version in one call using the Object ID.
az rest --method PATCH \ --uri "https://graph.microsoft.com/v1.0/applications/${OBJECT_ID}" \ --headers "Content-Type=application/json" \ --body '{ "identifierUris": ["{GATEWAY_URL}"], "api": { "requestedAccessTokenVersion": 2 } }' - Confirm the change by reading the application back.
az rest --method GET \
  --uri "https://graph.microsoft.com/v1.0/applications/${OBJECT_ID}?\$select=identifierUris,api" \
  -o json
The response should list your identifierUris and show “requestedAccessTokenVersion”: 2.
Step 3: Expose the API scopes
With the Application ID URI set, add the delegated scopes the gateway and Amazon Quick request.
- In the resource application, go to Expose an API.
- Choose Add a scope. In the Add a scope panel, complete the form for the first scope:
- Scope name:
mcp. - Who can consent?: Select Admins and users (or Admins only if your tenant requires administrator consent for all scopes)
- Admin consent display name: A short label, for example Access MCP tools.
- Admin consent description: For example, Allows the app to invoke MCP tools on behalf of the signed-in user.
- User consent display name and User consent description: Optional. Provide user-facing equivalents if you allowed user consent.
- State: Leave set to Enabled.
- Repeat Add a scope for each of the remaining delegated scopes, using the same consent and state settings:
mcp:stream.stream.invoke.
- When done, the Scopes defined by this API list shows all four scopes, each with its full Application ID URI (for example,
api://<gateway-id>.../mcp) and an Enabled state.
If Add a scope reports that the Application ID URI isn’t set, confirm that Step 2 completed successfully because the portal reads identifierUris set through Graph.
Configure the client application
Steps 4 and 5 register the client application and grant it permission to call the resource API.
Step 4: Register the client application (AnyCompany-Quick-MCP-Client)
The client application is the OAuth client Amazon Quick authenticates as.
- In App registrations, choose New registration.
- For Name, enter
AnyCompany-Quick-MCP-Client. - Under Supported account types, select Accounts in this organizational directory only (single tenant).
- Under Redirect URI, select platform Web and enter https://us-east-1.quicksight.aws.amazon.com/sn/oauthcallback. Choose Register.
- Go to Certificates & secrets > Client secrets > New client secret. Add a description and expiry, choose Add, then copy the secret Value (it’s shown only once).
- On the Overview page, copy the Application (client) ID. You now have the Client ID and Client Secret Amazon Quick requires.