As Amazon Quick environments scale and new AI-powered capabilities expand what users can do, automating user-level custom permissions becomes critical to maintaining the principle of least privilege. To address this, with custom permissions in Quick, you can enforce fine-grained access control by toggling specific features on or off for individual users. For example, with custom permissions, you can control access so that financial analysts author reports without exporting raw data, and external partners view dashboards without accessing sharing controls.
While Quick provides various options to apply custom permissions at the account, role, and user level, there are scenarios where your organization’s specific permissions need to be applied dynamically. This post walks through four architectural patterns to automate custom permissions assignment at key stages of the user lifecycle. The approaches range from a single API parameter to an event-driven automation, covering new users, future users, group-based logic, and retroactive bulk updates.
What we will cover
We will explore four scenarios to handle key stages of the user lifecycle:
- Pre-registered users: If you build custom portals or scripts, we show how to apply custom permissions proactively at the exact moment of user creation using the
RegisterUserAPI. - Default account or role permissions: To set default custom permissions at the account or role level, we cover how to use the
UpdateAccountCustomPermissionandUpdateRoleCustomPermissionAPIs to enforce a default profile for all existing and future users, no additional automation required. - Event-driven custom logic: When you need conditional logic beyond native defaults (such as applying different profiles based on group membership) we show how to use Amazon EventBridge and AWS Lambda to automatically detect new group memberships and apply permissions dynamically. This supports both native Quick groups and AWS IAM Identity Center (IDC) groups.
- Retroactive batch updates: For existing users who were provisioned before automation was in place, we provide a robust Python script to retroactively apply custom permissions to all users in specified Quick groups.
Scenario 1: Pre-registered users (API and CLI)
If you have a custom onboarding portal that provisions users using the RegisterUser API, you don’t need complex automation. You can apply custom permissions during the creation of the Quick user by including the --custom-permissions-name parameter in your call.
When to use this approach: Your organization controls the user creation process end-to-end through a custom portal or script. This is the most direct path, no event-driven infrastructure required. This is especially common for software as a service (SaaS) companies embedding Quick across customer accounts. For instance, automatically restricting premium features like paginated reports and GenBI based on a customer’s pricing tier at the moment each user is provisioned.
The following example applies a custom permissions profile named Restricted-Author-Profile to Authors in the account, but the same API can be used to apply permissions profiles to any role (including Author Pros, Admins, Admin Pros, Readers, and Reader Pros).
aws quicksight register-user \
    --aws-account-id 123456789012 \
    --namespace default \
    --identity-type QUICKSIGHT \
    --user-role AUTHOR \
    --email user@example.com \
    --user-name user_name \
    --custom-permissions-name "Restricted-Author-Profile"
Scenario 2: Default account or role permissions (API and CLI)
With two native APIs, you can set default custom permission profiles without per-user automation. Note that Quick custom permissions follow a three-level hierarchy (account, role, and user) where user-level settings override role-level, which override account-level, allowing administrators to implement flexible, layered security policies.
When to use this approach: These APIs cover both current and future use cases with minimal operational overhead. Start here before building custom automation. Move to Scenario 3 only if you need conditional logic beyond what account or role-level defaults support. For example, a 50,000-user enterprise may need all newly launched GenBI features and connectors blocked by default until their security team completes a 60–90-day review. An account-level default enforces that restriction instantly, without requiring any per-user automation and with no provisioning gap.
Option A: Account-level default
The UpdateAccountCustomPermission API sets a fallback custom permission profile that Quick applies to any user who doesn’t have an explicit profile assigned, including new users created with Just-In-Time provisioning.
aws quicksight update-account-custom-permission \
    --aws-account-id 123456789012 \
    --custom-permissions-name "Restricted-User-Profile"
Option B: Role-level default
With the UpdateRoleCustomPermission API, you can set a default custom permission profile per Quick role (READER, AUTHOR, ADMIN, and PRO roles).
aws quicksight update-role-custom-permission \
    --aws-account-id 123456789012 \
    --role AUTHOR \
    --namespace default \
    --custom-permissions-name "Restricted-Author-Profile"
Scenario 3: Event-driven custom logic (Amazon EventBridge and Lambda)
This scenario addresses more granular requirements: applying different custom permissions profiles to users based on which Quick or IAM Identity Center group they belong to. For example, a 125,000-employee technology services company needs authors in each business unit to receive distinct permission profiles at the moment of group assignment. This prevents cross-unit asset sharing while granting power-user access only to approved individuals, even though all authors share the same Quick role. Because we don’t have a native API for assigning custom permissions to a Group, we will need an architecture that detects when a user is added to a group that should have specific permissions.
Note: We suggest combining this approach with Scenario 2 for a fully layered permissions strategy. Scenarios 2 and 3 are complementary, not alternatives. When a user is provisioned through Just-In-Time federation, there’s an unavoidable window between account creation and the moment an administrator adds them to the appropriate group. Scenario 3 only fires on the group membership event.
To keep users from ever being in an unrestricted state, apply Scenario 2 first as a baseline: set an account-level or role-level default that enforces your most restrictive acceptable profile. Then use Scenario 3 to refine permissions once the user is assigned to a group. The user-level override from Scenario 3 will take precedence over the Scenario 2 default, so there is no conflict, only complementary layers of control.
Consider a global bank with more than 200,000 users, provisioned through single sign-on (SSO), that must block data export the instant an employee joins. Scenario 2 closes that gap immediately with a restrictive account-level default, and Scenario 3 refines permissions once the user is assigned to their compliance group. This prevents employees from downloading sensitive client data during the window between provisioning and group assignment.
Quick and IAM Identity Center emit distinct AWS CloudTrail events for group membership changes. Quick emits CreateGroupMembership when a user is added and DeleteGroupMembership when removed. IAM Identity Center emits AddMemberToGroup when a user is added and RemoveMemberFromGroup when removed. The following architecture detects these events to trigger permission updates automatically.
We will build this using Amazon EventBridge (to detect the event) and AWS Lambda (to apply the fix).
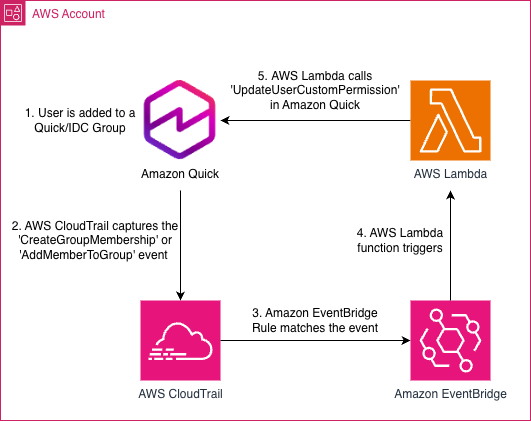
Figure 1: Event-driven architecture that applies a custom permission profile when a user is added to a Quick or IAM Identity Center group
- A user is added to a Quick or Identity Center group.
- Amazon CloudTrail: Captures the
CreateGroupMembershiporAddMemberToGroupevents. - Amazon EventBridge: Filters these logs to identify when a user is successfully added to the group.
- AWS Lambda: Extracts the user details and applies the correct permission profile using the
UpdateUserCustomPermissionAPI.
Prerequisites
Before implementing this solution, confirm you have the following:
- An AWS account with administrative access.
- AWS Identity and Access Management (IAM) permissions to create and manage AWS resources using AWS CloudFormation.
- Access to the following AWS services:
- AWS CloudFormation: deploys and manages the infrastructure stack as code.
- Amazon Quick: the target service where custom permissions are applied.
- AWS CloudTrail: must be enabled in the target AWS Region. Captures Quick and IDC API events that Amazon EventBridge consumes.
- Amazon EventBridge: filters CloudTrail events to detect group membership changes.
- AWS Lambda: executes the automation logic that calls the
UpdateUserCustomPermissionAPI. - AWS IAM Identity Center: required only if using IDC group-based triggers.
- Python 3.9+ and AWS Command Line Interface (AWS CLI) v2 are required for running the batch update script in Scenario 4.
Deploy with CloudFormation
You can deploy the full pipeline (IAM role, Lambda function, and Amazon EventBridge rule) using the provided CloudFormation template. The CloudFormation stack must be deployed in the same AWS Region as your Amazon Quick subscription, since Amazon EventBridge rules only capture events within their own Region.

The template accepts the following parameters:
| Parameter | Description |
| UseIdentityCenter | Set to true if your Quick account uses IAM Identity Center |
| TargetGroupName | The name of the group to apply custom permissions to. For Quick groups, this is the Quick group name. For IDC groups, this is the IDC group DisplayName. Important: Each deployment targets either a Quick group or an IDC group, never both. To monitor both group types, deploy separate stacks. |
| PermissionProfileName | Name of the Quick custom permissions profile to apply to members of this group. This profile must already exist in your Quick account before deployment. |
| QuickNamespace | Quick namespace for user management. |
| LambdaFunctionPrefixName | Prefix used for the Lambda function name. |
If you prefer to deploy manually, follow these steps:
Step 1: Create the IAM role for Lambda
Your Lambda function needs permission to interact with Quick.
- Go to the IAM Console → Policies → Create policy.
- Switch to the JSON tab and paste this policy:
- Note: the permissions to IdentityStore are only needed if your Quick account is integrated with IAM Identity Center.
{ "Version": "2012-10-17", "Statement": [ { "Effect": "Allow", "Action": [ "logs:CreateLogGroup", "logs:CreateLogStream", "logs:PutLogEvents" ], "Resource": "arn:aws:logs:*:YOUR_ACCOUNT_ID:log-group:/aws/lambda/Auto-Assign-QS-Permissions:*" }, { "Effect": "Allow", "Action": [ "quicksight:UpdateUserCustomPermission", "quicksight:DeleteUserCustomPermission", "quicksight:UpdateUser", "quicksight:DescribeUser" ], "Resource": "arn:aws:quicksight:*:*:user/*" }, { "Effect": "Allow", "Action": [ "identitystore:DescribeUser", "identitystore:DescribeGroup" ], "Resource": "*" } ] } - Name the policy
Quick-Lambda-Policyand choose Create policy. - Navigate to Roles → Create role.
- Select AWS Service and choose Lambda.
- Choose Next.
- Search for and select the
Quick-Lambda-Policy. - Choose Next.
- Name the Role
Quick-Auto-Permissions-Roleand select Create role.
Step 2: Deploy the Lambda function
- Go to the Lambda Console → Create function.
- Function name:
Auto-Assign-QS-Permissions. - Runtime: Python 3.14 (or latest available).
- Execution role: Use another role → Select
Quick-Auto-Permissions-Role. - Choose Create function.
- Under Configuration → General configuration, increase the timeout to 30 seconds.
- This should be sufficient for single-event processing. If you observe timeouts in Amazon CloudWatch Logs, increase this value accordingly.
- Set the following environment variables under Configuration → Environment Variables:.
| Variable Name | Description |
| PERMISSION_PROFILE | Exact name of the custom permissions profile created in Quick to apply |
| TARGET_GROUP_NAME | Name of the group to monitor (Quick group name or IDC group DisplayName) |
| NAMESPACE | Quick namespace (typically “default”) |
- Navigate back to the Code Source editor and paste the following code:
import logging
import os
import time
import boto3

logger = logging.getLogger()
logger.setLevel(logging.INFO)

quicksight = boto3.client("quicksight")
identity_store = boto3.client("identitystore")

def lambda_handler(event, context):
    detail = event.get("detail", {})
    event_source = detail.get("eventSource", "")
    event_name = detail.get("eventName", "")
    permission_profile = os.environ["PERMISSION_PROFILE"]
    target_group = os.environ["TARGET_GROUP_NAME"]
    namespace = os.environ["NAMESPACE"]

    account_id = (
        detail.get("userIdentity", {}).get("accountId")
        or detail.get("recipientAccountId")
    )

    logger.info(
        "Event received: source=%s, name=%s", event_source, event_name
    )

    try:
        if event_source == "sso-directory.amazonaws.com":
            return handle_idc_event(detail, account_id, namespace, permission_profile, target_group)
        elif event_source == "quicksight.amazonaws.com":
            return handle_quicksight_event(detail, account_id, namespace, permission_profile, target_group)
        else:
            logger.warning("Unknown event source: %s", event_source)
            return {"statusCode": 200, "body": "Unknown event source"}
    except Exception as e:
        logger.error("Error processing event: %s", str(e))
        return {"statusCode": 500, "body": str(e)}

def handle_idc_event(detail, account_id, namespace, permission_profile, target_group):
    """Handle AddMemberToGro