Reinforcement learning (RL) post-training is becoming a standard step in building capable language model agents. Models learn to reason and act across sequences of steps by generating trajectories, receiving rewards, and updating their policy based on outcomes. Running this at scale, across multiple nodes with hundreds of GPU-hours of rollouts per training run, requires persistent cluster infrastructure. That infrastructure needs to sustain long jobs, recover from hardware failures without losing progress, and provide visibility into training dynamics as they unfold.
Amazon SageMaker HyperPod provides this infrastructure for large-scale machine learning (ML) workloads on Amazon Elastic Kubernetes Service (Amazon EKS). Through its cluster resiliency features, it continuously monitors node health and automatically replaces faulty nodes, so a hardware failure does not take the cluster down with it. Paired with checkpointing, a training job can pick up from its last saved step instead of restarting from scratch. This matters for long multi-node RL runs, where a single hardware failure would otherwise cost hours of rollout progress. Combined with the Ray capabilities on HyperPod, you can create Ray clusters from SageMaker Studio, submit jobs remotely using secure connections, and monitor training through pre-built Amazon Managed Grafana dashboards that the HyperPod Observability EKS add-on provisions for you.
In this post, we show how to use these capabilities to run SkyRL, an open-source RL framework, to train a Qwen3-VL-8B vision-language model to navigate visual mazes using Group Relative Policy Optimization (GRPO) on SageMaker HyperPod. Starting from the VisGym SFT checkpoint, a supervised fine-tuning (SFT) starting point, GRPO post-training on HyperPod improves the maze solve rate from 43.75% to more than 95% on a fixed 64-maze evaluation set.
Prerequisites
To follow this walkthrough, you need:
- A SageMaker HyperPod cluster with Amazon EKS orchestration that has at least 3 ml.g7e.12xlarge instances and one ml.r5d.16xlarge instance.
- The following Kubernetes operators installed in your cluster: KubeRay operator, HyperPod Observability EKS add-on, and HyperPod Ray Endpoint Operator (for remote job submission). See the Ray on HyperPod getting started guide.
- The Amazon FSx for Lustre CSI driver installed on the cluster. You also need an Amazon FSx for Lustre filesystem, a PersistentVolume backed by that filesystem, and a PersistentVolumeClaim (ReadWriteMany) that the pods can mount. The training job uses this at
/sharedfor checkpoint storage, Low-Rank Adaptation (LoRA) adapter synchronization, and evaluation output. - A SageMaker Studio domain with permissions to connect to your HyperPod cluster. See setting up SageMaker Studio for Ray.
- The
toolkit-for-ray-on-sagemaker-aiPython package installed.
Background
This section reviews the reinforcement learning concepts behind the training and the cluster topology the walkthrough uses.
Multi-turn RL and GRPO
Standard single-turn RL assigns a reward to a single model output. Multi-turn RL instead trains an agent over a whole sequence of steps, where it observes a state, acts, gets feedback, and moves on to the next state. The policy learns from the reward accumulated over the entire episode rather than from any one step.
Consider the example problem of navigating a 2D maze. One episode is a single run at a maze, and each turn is one move: the model looks at the current picture of the maze, chooses a direction or decides to stop, and the environment sends back the updated view. Rewards are sparse, so the model earns 1.0 only when it actually reaches the goal within the move limit and nothing otherwise. There is no move-by-move answer key to train against, since whether a move was good depends on the moves around it.
This is where SkyRL’s Group Relative Policy Optimization (GRPO) comes in. For each starting position, the agent runs the maze several times under the current policy, and GRPO grades those runs against one another, reinforcing the ones that beat the group’s average and pushing down the ones that trail it. That within-group comparison is the whole training signal, which lets GRPO work without a separate critic or value model.
Training topology
The solution discussed here runs SkyRL on a HyperPod Ray cluster with three GPU worker nodes and a CPU head node. SkyRL colocates inference and training on the same GPUs: vLLM engines generate rollouts (complete maze episodes) while a policy model sharded with Fully Sharded Data Parallel (FSDP) handles gradient updates. After each optimizer step, updated LoRA adapter weights sync from the training ranks to the inference engines through Amazon FSx for Lustre shared storage.
These are the instance types we used. Other GPU instances and cluster sizes work as well, provided the workers have enough GPU memory for the model.
- Workers: 3x
ml.g7e.12xlarge(2x NVIDIA RTX PRO 6000 Blackwell GPUs each, 6 GPUs total). - Head:
ml.r5d.16xlarge(512 GB RAM, manages Ray GCS, dashboard, and LoRA adapter consolidation). - Policy model:
Qwen3-VL-8Bwith LoRA (rank 32), sharded across the 6 GPUs using PyTorch FSDP. - Rollout engines: 6 colocated vLLM instances, one per GPU.
- Shared storage: Amazon FSx for Lustre at
/shared, used for LoRA sync and evaluation output.
HyperPod provides the cluster infrastructure: the Ray cluster is created from SageMaker Studio, job submission uses the sagemaker_ray:// protocol, and training metrics flow automatically into pre-built Amazon Managed Grafana dashboards through the HyperPod Observability add-on.
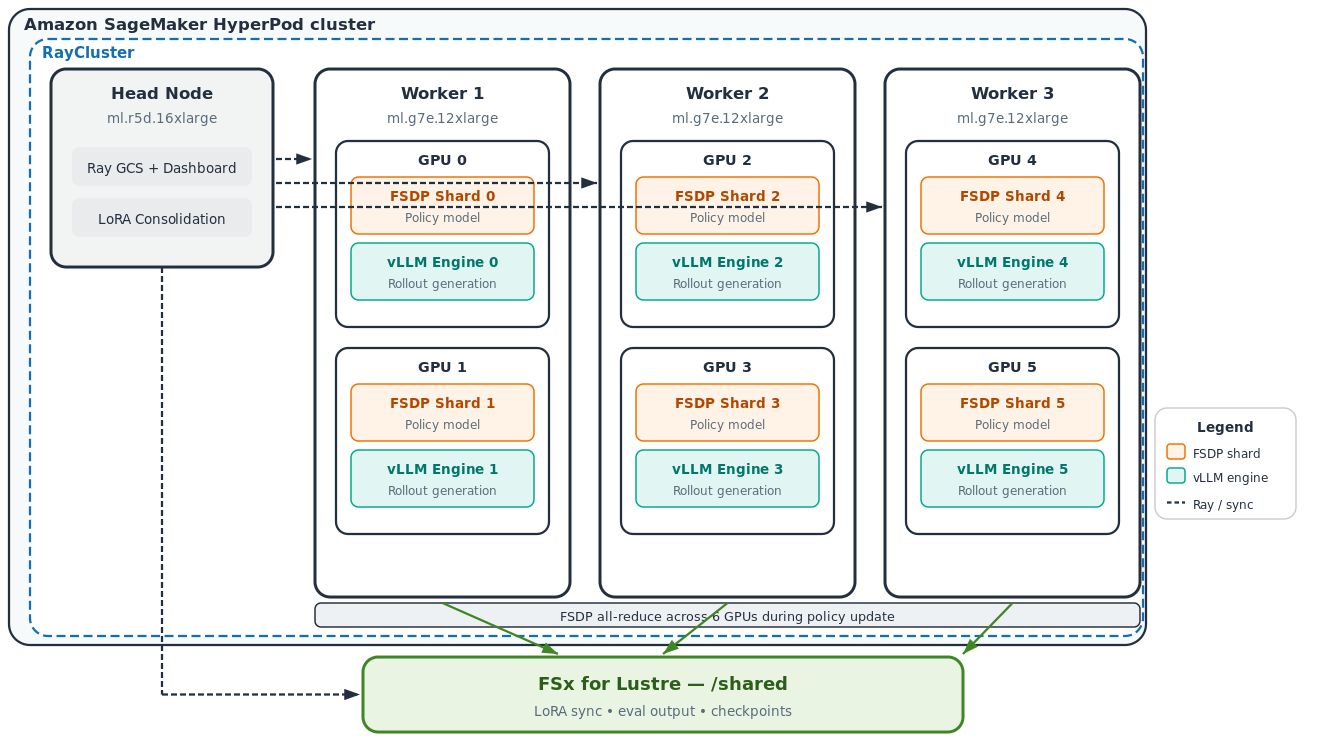
Figure 1: RayCluster topology on Amazon SageMaker HyperPod, with one CPU head node and three GPU worker nodes that colocate FSDP policy shards and vLLM rollout engines over a shared Amazon FSx for Lustre filesystem
Solution overview
The following steps walk through preparing the training environment, launching the cluster, running the job, monitoring progress, and hosting the trained model.
Step 1: Prepare the container image
To get started quickly, use the following Dockerfile to build a container image with SkyRL, VisGym, and their dependencies pre-installed. This is the image you will specify when launching your Ray cluster on HyperPod in the next step. It builds on the official NovaSky-AI SkyRL base and pins both SkyRL and VisGym to specific commit SHAs so the build is reproducible:
FROM novaskyai/skyrl-train-ray-2.57.0-py3.12-cu13.0

ENV HF_HUB_ENABLE_HF_TRANSFER=1 \
    QWEN_VL_MODEL=Qwen/Qwen3-VL-8B-Instruct \
    UV_PROJECT_ENVIRONMENT=/home/ray/anaconda3

# SkyRL's full FSDP stack into the system python Ray uses (uv .venv is invisible to `ray start`).
# Pinned to a commit SHA so the build is reproducible.
ARG SKYRL_REF=4298730b55bb01fe1b711662df53dca42a3b7615
RUN git clone https://github.com/NovaSky-AI/SkyRL.git /home/ray/skyrl \
    && cd /home/ray/skyrl && git checkout ${SKYRL_REF} \
    && cd /home/ray/skyrl/skyrl-train \
    && uv sync --active --extra fsdp \
    && /home/ray/anaconda3/bin/python -c \
       "import ray, torch, vllm, transformers, flash_attn; \
        from vllm_router.launch_router import launch_router; \
        print('skyrl stack OK', torch.__version__, vllm.__version__)"

# uv sync prunes Ray's dashboard extras; restore ray[default] so the full dashboard starts.
RUN uv pip install --python /home/ray/anaconda3/bin/python "ray[default]==2.57.0" \
    && /home/ray/anaconda3/bin/python -c \
       "from ray.dashboard.optional_deps import aiohttp"

# VisGym maze environment and dataset generator.
ARG VISGYM_REF=184fbd5e5dc81e32c8b944d9e40ac54dad62e3f2
RUN git clone https://github.com/anyscale/VisGym.git /home/ray/visgym \
    && cd /home/ray/visgym && git checkout ${VISGYM_REF} \
    && uv pip install --python /home/ray/anaconda3/bin/python -e . "pygame==2.6.1"

ENV FI_PROVIDER=efa FI_EFA_USE_DEVICE_RDMA=1 NCCL_PROTO=simple NCCL_DEBUG=INFO
WORKDIR /workspace
CMD ["/bin/bash"]
Build the image and push it to an Amazon Elastic Container Registry (Amazon ECR) repository in your account. Note the full image URI, as you will use it when creating the Ray cluster in the next step:
ACCOUNT=$(aws sts get-caller-identity --query Account --output text)
REGION=us-west-2
IMAGE_URI="${ACCOUNT}.dkr.ecr.${REGION}.amazonaws.com/ray/skyrl-visgym:latest"

aws ecr get-login-password --region ${REGION} | \
  docker login --username AWS --password-stdin ${ACCOUNT}.dkr.ecr.${REGION}.amazonaws.com

docker build -t skyrl-visgym .
docker tag skyrl-visgym ${IMAGE_URI}
docker push ${IMAGE_URI}

echo "Image URI: ${IMAGE_URI}"
Step 2: Launch the Ray cluster from SageMaker Studio
Navigate to SageMaker Studio, choose HyperPod, select your cluster, then go to the Tasks tab. From the task type list, choose RayCluster, then choose Create Ray Cluster.
In the creation form, give the cluster the name skyrl-visgym, set the head instance type to ml.r5d.16xlarge, and add three workers using ml.g7e.12xlarge. Set the container image to the IMAGE_URI you pushed in Step 1.
The instance types listed here are what we used for this walkthrough. Other instance types will work, but keep one constraint in mind for the head node: it needs large memory. The head consolidates LoRA adapter shards from the GPU workers at each checkpoint save, which briefly loads the full adapter weight set into CPU memory. We used ml.r5d.16xlarge for its large memory capacity (512 GB RAM) to accommodate this.
Mounting Amazon FSx for Lustre
To attach your Amazon FSx filesystem, choose the YAML button in the top-right corner of the creation form to switch to the raw manifest editor, then add the volume and mount to both the head and worker pod specs. The relevant section for each pod looks like this:
containers:
  - name: ray-head  # or ray-worker
    volumeMounts:
      - name: shared
        mountPath: /shared
volumes:
  - name: shared
    persistentVolumeClaim:
      claimName: <your-fsx-pvc-name>
Replace <your-fsx-pvc-name> with the name of the PersistentVolumeClaim backed by your Amazon FSx filesystem. With this in place, /shared is available on every node in the cluster and the training job can read and write checkpoints, LoRA weights, and evaluation output from the pods.
Turn on Remote endpoints so you can submit jobs and open dashboards without a local kubectl port-forward. The cluster generates IAM-authenticated URLs for both.
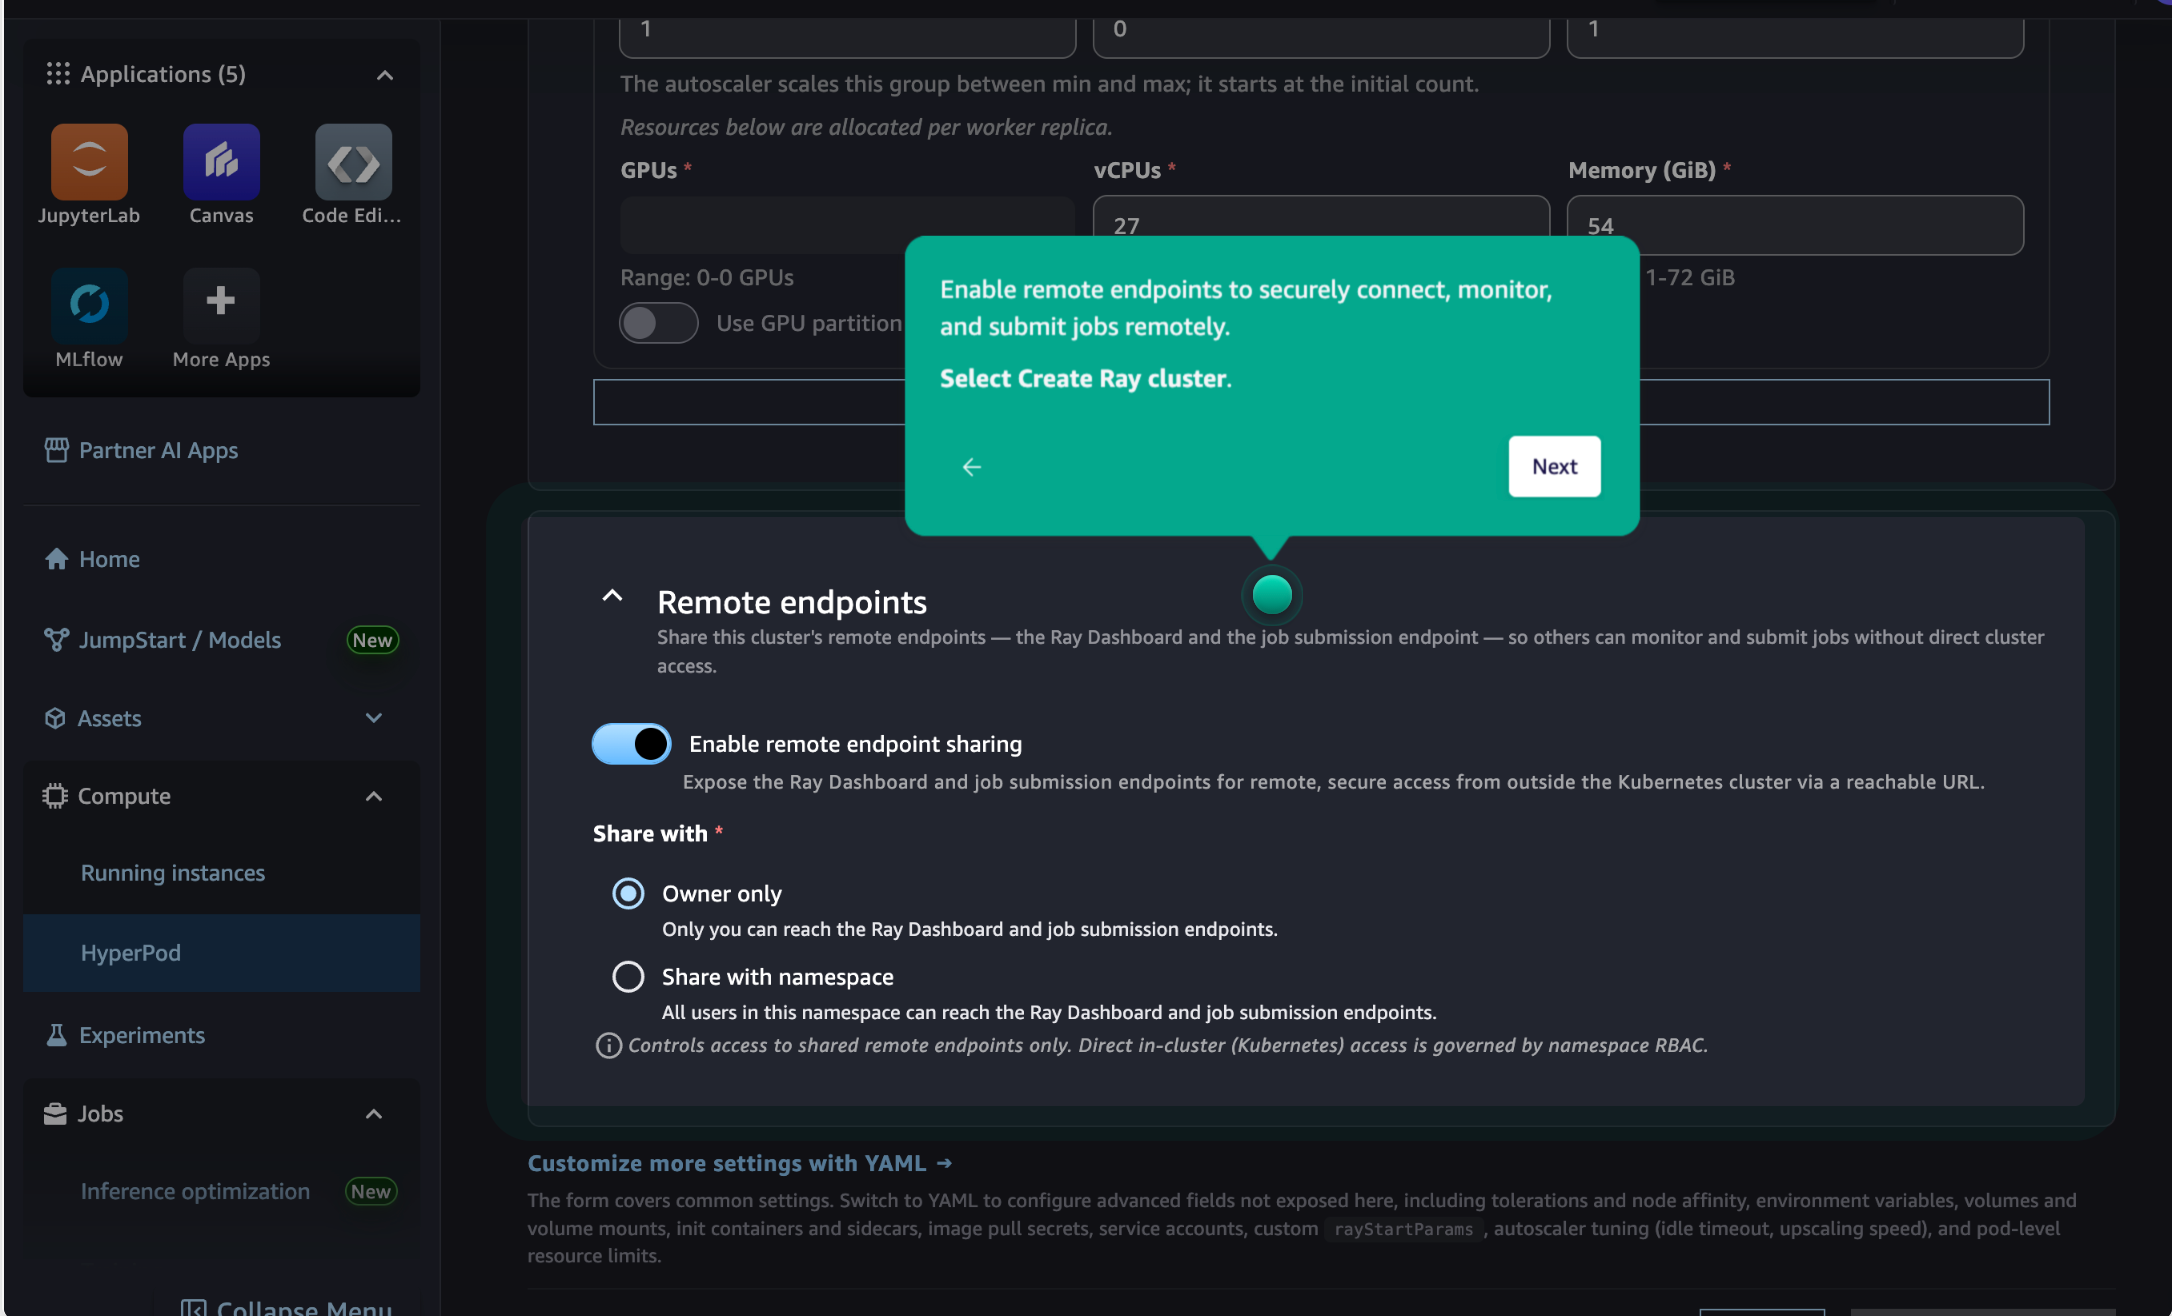
Figure 2: The Create Ray Cluster form in SageMaker Studio with remote endpoints turned on for job submission and dashboard access
Once the cluster reaches Running status, the Actions menu in the Tasks tab offers Open Ray Dashboard, Open Grafana, and cluster management options.
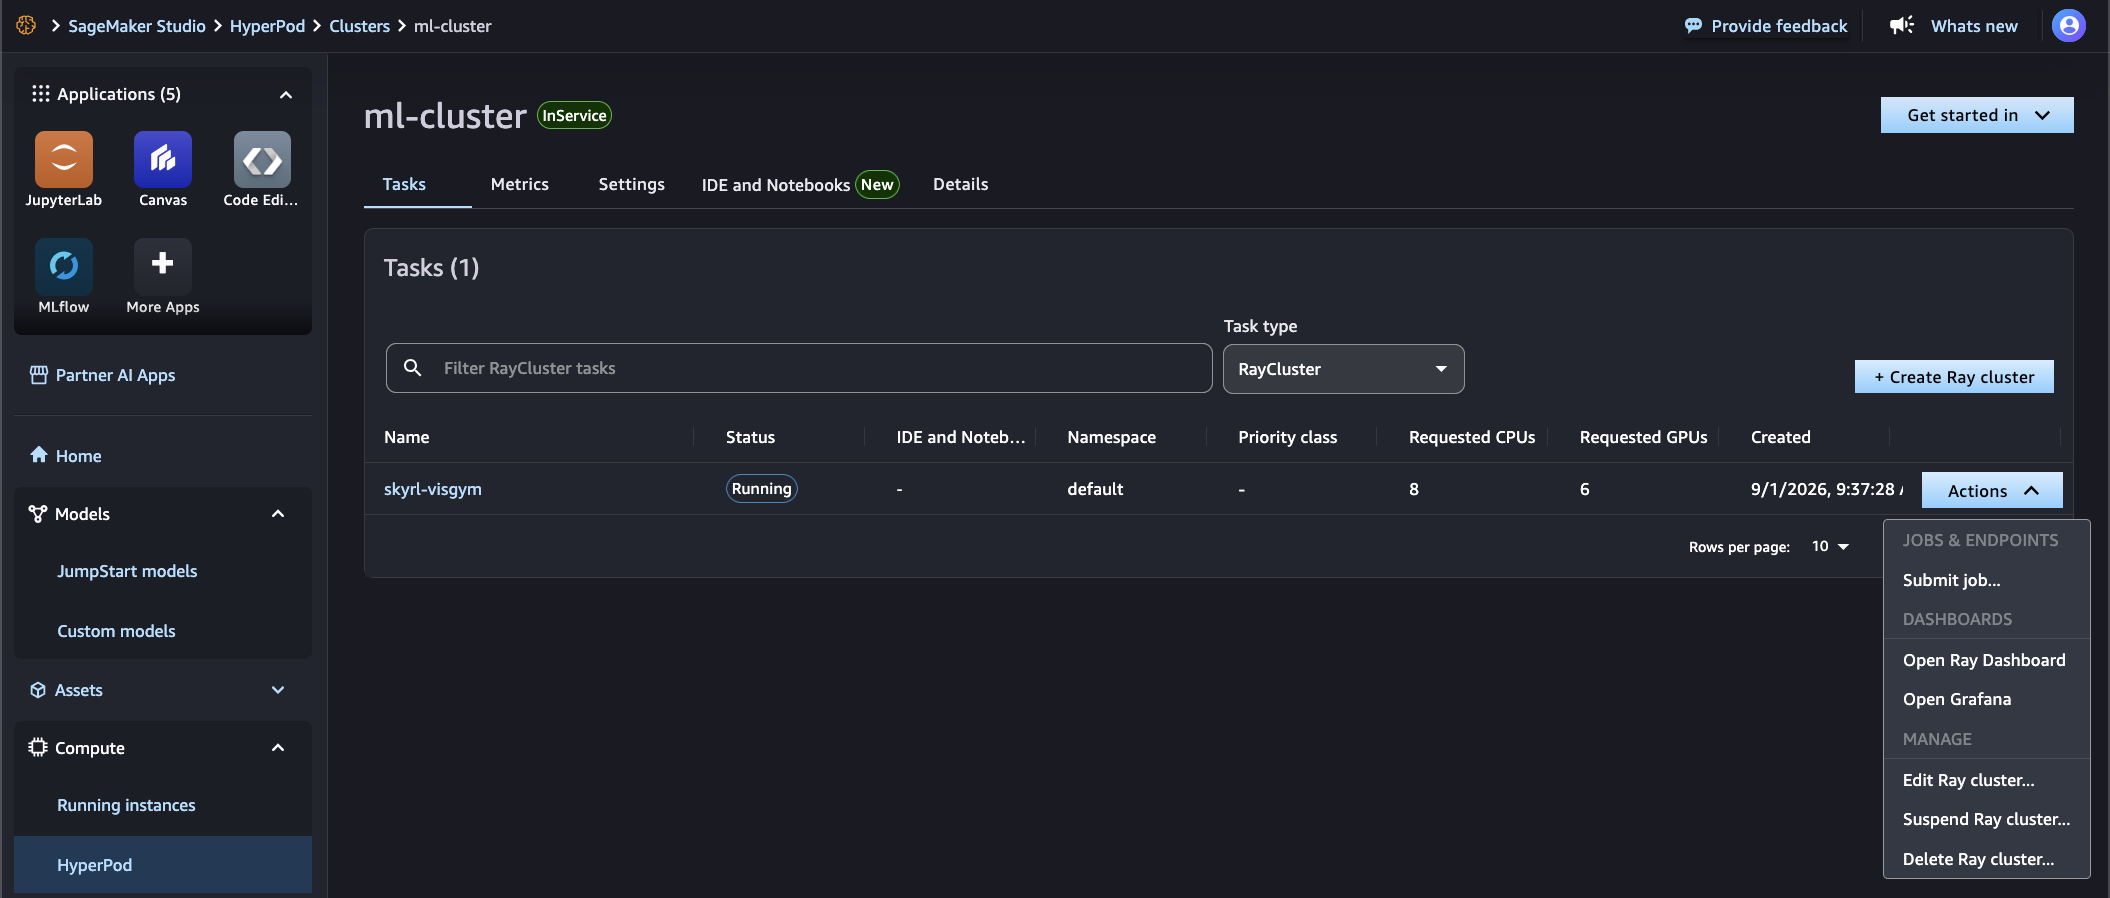
Figure 3: The skyrl-visgym Ray cluster at Running status in the SageMaker Studio Tasks tab, with the Actions menu open
Step 3: Prepare the training script
Save the following as train_job.sh in your working directory. The script downloads the SFT checkpoint and generates datasets on first run (both go to Amazon FSx, so they persist across runs), then launches the GRPO training job.
The SFT checkpoint gives GRPO a strong starting point: Qwen3-VL-8B pre-trained on VisGym demonstrations already knows how to parse a maze image and emit structured move actions, so GRPO only needs to refine which sequences reach the goal.
With trainer.placement.colocate_all=true, the vLLM rollout engines and FSDP policy workers share the same GPUs. During rollout, GPUs run inference in parallel. During the policy update step, they run FSDP training collectively. The lora_sync_path points to Amazon FSx so updated adapter weights are immediately visible to the inference engines on the nodes after each optimizer step. Without colocation, you need separate GPU pools for training and inference, and they sit idle waiting for each other between phases, a ping-pong pattern that wastes compute. Colocation avoids that idle time by having training and inference take turns on the same hardware. That is why gpu_memory_utilization=0.45 is set conservatively: each GPU needs headroom for both the FSDP shard and the vLLM KV cache at the same time.
A few other parameters are worth noting. n_samples_per_prompt=8 controls how many rollout trajectories GRPO generates per maze prompt to compute the group advantage. max_turns=15 caps each episode at 15 moves. hf_save_interval=20 consolidates LoRA adapter shards onto the head node and saves a Hugging Face-compatible checkpoint every 20 steps. eval_interval=10 runs the held-out 64-maze evaluation every 10 steps so you can track solve rate as training progresses.
The job also writes full training checkpoints so it can recover from an interruption. Setting ckpt_interval=20 saves the complete training state to ckpt_path every 20 steps. That state includes the model weights, optimizer state, learning rate schedule, and dataloader position. resume_mode=latest tells SkyRL to pick up from the most recent checkpoint under that path when the job starts. Point ckpt_path at durable shared storage that is not tied to a single node, such as an Amazon Simple Storage Service (Amazon S3) prefix or your Amazon FSx mount. Keep the path stable across runs so a restarted job can find its checkpoint. This is what pairs with HyperPod cluster resiliency. When a node fails, HyperPod detects and replaces it automatically, and when you resubmit the job it continues from the last saved step instead of starting over. The full checkpoints written here capture training state for resumption, while the hf_save_interval exports capture inference-ready LoRA adapters, so the two run alongside each other for different purposes.
#!/usr/bin/env bash
# GRPO fine-tune from the VisGym SFT checkpoint on maze_2d/easy.
set -euxo pipefail
cd /home/ray/skyrl
export HF_HUB_ENABLE_HF_TRANSFER=0
export SKYRL_RAY_PG_TIMEOUT_IN_S=600
RUN_ID=$(date +%Y%m%d-%H%M%S)
EXPORT_PATH="/shared/runs/${RUN_ID}-train"

ENV_ID=maze_2d/easy
TRAIN_DIR=/tmp/visgym_train_256
EVAL_DIR=/tmp/visgym_eval_seeded
SFT_CKPT=/shared/models/visgym_sft_mixed_qwen3vl

if [ ! -f "$SFT_CKPT/config.json" ]; then
  echo "=== Downloading SFT checkpoint ==="
  mkdir -p "$SFT_CKPT"
  python -c "
from huggingface_hub import snapshot_download
snapshot_download(repo_id='VisGym/visgym_model', allow_patterns='mixed_qwen3vl/*',
    local_dir='$SFT_CKPT', local_dir_use_symlinks=False)
import shutil, os; src='$SFT_CKPT/mixed_qwen3vl'
[shutil.move(os.path.join(src,f),'$SFT_CKPT') for f in os.listdir(src)]; os.rmdir(src)
"
fi

python examples/train/visgym/dataset.py --env_id "$ENV_ID" --num_rows 256 --output_dir "$TRAIN_DIR"
python examples/train/visgym/dataset.py --env_id "$ENV_ID" --num_rows 64  --seed --output_dir "$EVAL_DIR"

python examples/train/visgym/entrypoint.py \
  --env_variant sft \
  data.train_data="['$TRAIN_DIR/train.parquet']" \
  data.val_data="['$EVAL_DIR/train.parquet']" \
  trainer.algorithm.advantage_estimator="grpo" \
  trainer.policy.model.path="$SFT_CKPT" \
  trainer.policy.model.lora.rank=32 \
  trainer.policy.model.lora.alpha=32 \
  trainer.policy.model.lora.lora_sync_path="/shared/lora" \
  trainer.placement.colocate_all=true \
  trainer.strategy=fsdp \
  trainer.placement.policy_num_nodes=3 \
  trainer.placement.policy_num_gpus_per_node=2 \
  trainer.placement.ref_num_nodes=3 \
  trainer.placement.ref_num_gpus_per_node=2 \
  trainer.ref.fsdp_config.cpu_offload=false \
  generator.inference_engine.num_engines=6 \
  generator.inference_engine.tensor_parallel_size=1 \
  generator.inference